
Updated: September 14, 2026
Table of contents
Viewing your memberships
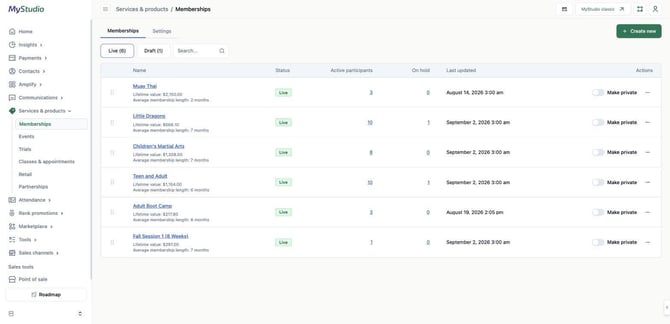
The Memberships list under Services & Products.
-
Go to Services & Products > Memberships.
-
Click the Live tab to see published memberships, or Draft to see unpublished ones.
-
Use the Search bar to find a membership by name.
-
Click the ⋯ menu next to any membership to Edit, Duplicate, Copy URL, Preview, Unpublish, View Participants, or Delete it.
Creating a new membership
A membership is the top-level category for what you're offering — think "Little Tigers," "Adults Tae Kwon Do," or "Kickboxing." It's the main offering participants see when they register, and it can hold several pricing options underneath it.
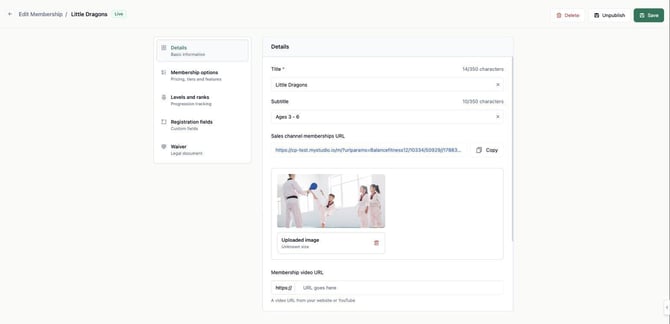
The Details tab of a membership, under Edit Membership.
-
Click + Create New in the top right.
-
Choose Custom to build one from scratch, or Choose a Template to start from an existing layout.
-
On the Details tab, enter a Title — this is required before MyStudio will let you save or move to the next tab.
-
Enter an optional Subtitle.
-
Click the image upload area to add a photo.
-
Add a description in the text box. This is what students see when they sign up.
|
NOTE You'll need to enter a title before MyStudio lets you save or move to the next tab. |
Setting pricing options
A membership option is a specific pricing plan that sits inside a membership. Each membership needs at least one, and can have several — like a Month-to-Month option and a Pay-in-Full annual option on the same membership.
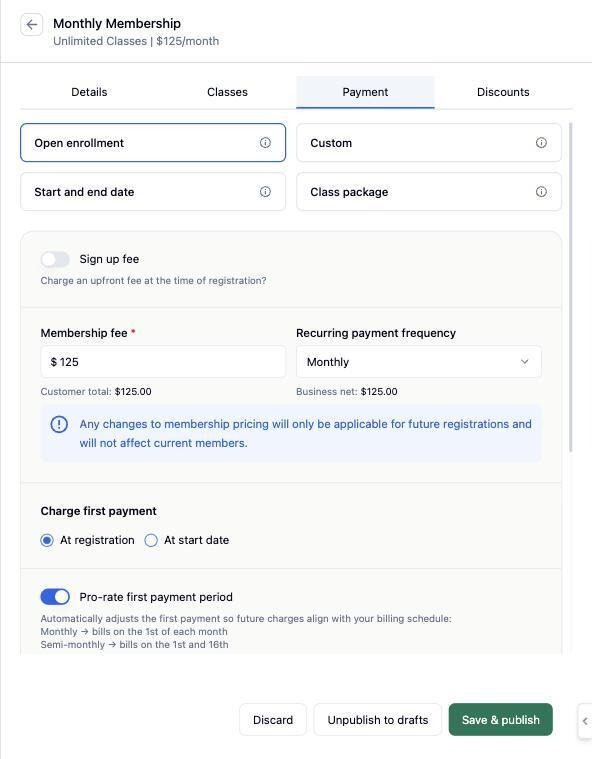
The Payment tab of a pricing option, under Membership Options.
|
Type |
Best for |
|---|---|
|
Open enrollment |
Auto-renewing memberships that continue until you cancel them |
|
Custom |
Custom-length structures, like a 12-month or 12-week membership |
|
Start and end date |
Programs with a fixed start and end date, like an after-school program or a 10-week fitness bootcamp |
|
Class package |
Selling classes by the number, like a 10-class or 25-class package |
-
Open the Membership Options tab.
-
Click + Add New to create a pricing tier — for example, "Month to Month" or "Annual."
-
On the option's Details tab, give it a name and subtitle.
-
Open the Payment tab and choose how it works: Open Enrollment, Custom, Start and End Date, or Class Package.
-
Enter the Membership Fee and choose how often it recurs (for example, Monthly).
-
Turn on Sign Up Fee if you want to charge an upfront fee at registration, and enter the amount.
-
Under Charge First Payment, choose At Registration or At Start Date.
-
Turn on Pro-Rate First Payment Period if you want the first charge adjusted to align future billing to a set date, like the 1st of the month.
-
Open the Classes tab for this same option and choose Custom Classes (students pick a start date by booking their first class) or Open Calendar (students just pick a start date, no class booking).
|
NOTE For full setup details on each payment structure, see Membership option types. |
Adding a discount to a pricing option
-
Inside a membership option, open its Discounts tab.
-
Click + Add New.
-
Enter a Discount Name.
-
Enter the Discount Value, and click the % or $ icon to set it as a percentage or flat amount.
-
Confirm Apply Discount To is set to Membership Fee.
-
Click Save.
|
NOTE This discount only applies to this one pricing option. It's separate from any studio-wide discount codes you run in Retail. |
Adding belt levels and ranks
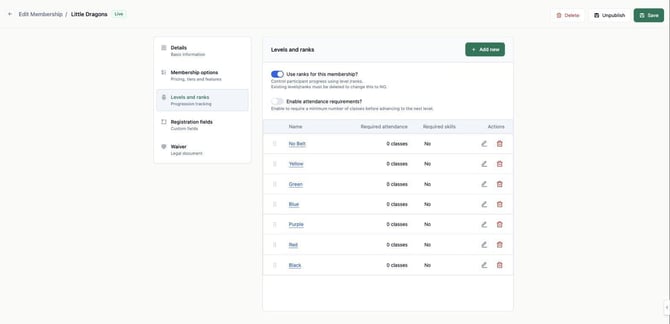
Levels and Ranks, under Edit Membership.
-
Go to Levels and Ranks.
-
Turn on Use Ranks for This Membership?
-
Turn on Enable Attendance Requirements? if students need to attend a minimum number of classes before advancing.
-
Click + Add New to create a rank, then repeat for each additional rank or belt level.
Setting up registration fields and a waiver
-
Go to Registration Fields. You'll see the required system fields: First Name, Last Name, and Date of Birth.
-
Click + Add New to add a custom field, like Belt Size or Uniform Size, then choose its field type (for example, Short Answer or Dropdown).
-
Go to the Waiver tab.
-
Click Edit to open the waiver editor.
-
Write or paste in your liability waiver text, using the formatting toolbar for headings, bold, or bullet points.
-
Click Save.
Making a membership private or removing it
-
From the memberships list, find the membership you want to change.
-
Turn on the Make Private toggle to hide it from your public sign-up page — current members keep their access.
-
Turn the toggle back off to make it public again.
-
To remove it entirely, open the membership and click Unpublish (keeps it as a draft) or Delete (removes it permanently) in the top right.
Setting studio-wide membership settings
The Settings tab next to Memberships controls whether customers can find and register for memberships at all.
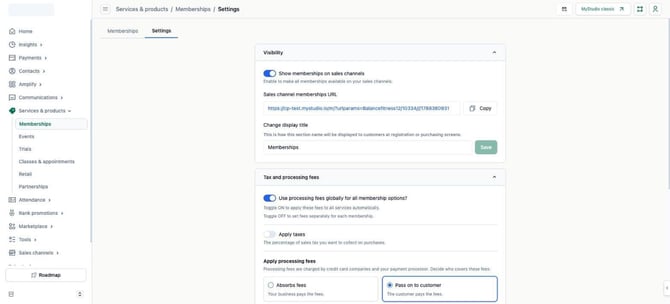
Visibility and Tax and Processing Fees, under Memberships > Settings.
-
Click the Settings tab next to Memberships at the top of the page.
-
Under Visibility, toggle Show Memberships on Sales Channels on or off.
-
Copy the Sales Channel Memberships URL if you want to link to your memberships page directly, for example from your website or a social media bio.
-
Under Change Display Title, edit the text field and click Save to change what customers see at registration or checkout.
-
Under Tax and Processing Fees, toggle Use Processing Fees Globally for All Membership Options? on to apply one fee setting to every membership, or off to set fees per membership.
-
Toggle Apply Taxes on if you collect sales tax on memberships.
-
Under Apply Processing Fees, choose Absorbs Fees (your studio pays the card processing fee) or Pass on to Customer (the member pays it), then click Save.
-
Under Source: How Customers Find Your Business, toggle Enable Source Field While Customers Register on if you want to ask new members how they heard about you.
-
Click + Add New to add your own source options beyond the defaults (Member Referral, Google, Facebook, Studio Location) — for example, a specific school or a bring-a-friend event.
Example: Launching a kids BJJ program with belt tracking
A studio adding a new "Little Dragons" Brazilian Jiu-Jitsu program for ages 6–12 wants monthly billing, a one-time gear fee, and belt progression that's visible to parents.
-
Create a new membership called Little Dragons BJJ, with a subtitle like "Ages 6-12" and a photo of the kids' class.
-
Under Membership Options, add a Month to Month option, set the Membership Fee to $120/month, and turn on Sign Up Fee for a one-time $75 charge (covers the student's first gi).
-
Set Charge First Payment to At Registration so the sign-up fee and first month are both collected on day one.
-
Under Levels and Ranks, turn on Use Ranks for This Membership? and add each belt — White, Grey, Yellow, Orange, Green — in order.
-
Turn on Enable Attendance Requirements? and set a minimum class count for each belt (for example, 40 classes before Grey), so a student's progress bar fills in automatically as they attend class.
-
Under Registration Fields, add a custom field for Uniform Size so you know what gi size to order before their first class.
Example: Offering a sibling discount
A family enrolls two kids in the same program, and the studio wants the second child's membership fee reduced automatically instead of manually adjusting invoices every month.
-
Open the membership the siblings are considering enrolling in, and go to its Month to Month pricing option.
-
Open the option's Discounts tab and click + Add New.
-
Name it Sibling Discount, set the Discount Value to 15%, and confirm it applies to the Membership Fee.
-
Click Save, then apply the discount code when registering the second sibling.
Common questions
What's the difference between Custom and Choose a Template?
Custom starts you with a blank membership. Choose a Template pre-fills common settings so you have less to set up yourself.
What happens if I make a membership private?
It disappears from your public sign-up pages, but current members keep their access. Use this when a membership is full or no longer offered to new students.
Why can't new students see a membership on my website?
Check that Make Private is off for that membership, and that Show Memberships on Sales Channels is turned on under Memberships > Settings > Visibility.
Who pays the credit card processing fee?
That's up to you — under Memberships > Settings > Tax and Processing Fees, choose Absorbs Fees if your studio covers it, or Pass on to Customer if you'd rather the member pay it.
Still need help?
Reach out to MyStudio support through the chat bubble in your dashboard, or email success@mystudio.com.