
Updated: Mrach 18, 2026
Table of contents
- ATA test sheet
- Frequently asked questions (FAQs)
- What is a CSV file?
- How do I open a CSV file?
- How do I edit testing events?
- How to edit event registrations
- How to make an event into a testing event
- I accidentally made an event a testing event. How do I change it?
- Can I edit the column headers in the ATA test sheet?
- Can I click on the event to see the registered participants without exporting anything?
- How to see which students have which belt sizes for a testing event
- Was this article helpful?
Permissions and accessibility
Staff access:
-
Admin: Full access
-
Manager: Full access
-
Staff: No access
MyStudio plan restrictions:
-
Starter: No access
-
Growth: Full access
-
Scale: Full access
Note: Creating ranked events is only available for growth and scale plans. If you are on our starter plan, this V2 section discussed may appear as a blank table.
❗ Important First Steps❗
Step 1: Set up ranked events
To set up ranked events, check out these articles:
-
Ranks set up under memberships (Learn more)
-
Rank event set up (Learn more)
-
(optional) Skills listed under memberships (Learn more)
-
(optional) Attendance limits set up in memberships (Learn more)
Note: Only ranked events show in the testing events section. If you do not set events as “ranked,” the events will not show in the section.
Step 2: Invite students to ranked events
For inviting students to our V2 rank center, check out these articles:
Step 3: Add belt sizes to participants
For adding belt sizes to participants, check out this article:
^ Back to top
Testing events table
Access testing events list in V2
To view your testing events,
-
Log into V2.
-
Go to “rank promotions” from the left hand column.
-
Go to “testing events.”
-
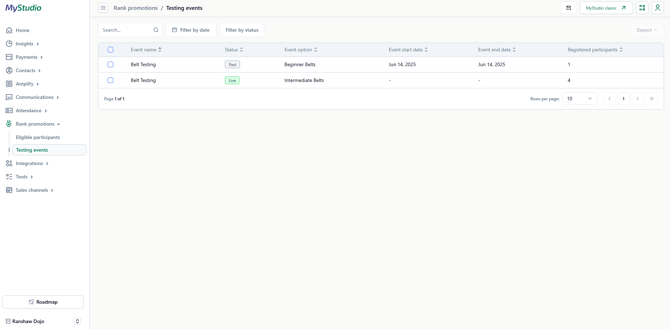
A table will appear which shows your ranked events (live and past events).
^ Back to top
Info in the testing table
In this table, you will see in column view,
-
Event name
-
Status
-
Event option
-
Event start date
-
Event end date
-
Registered participants
Filtering the table
You can filter this table by:
-
Event date
-
Yesterday
-
Last 7, 30, 60, or 90 days
-
Last quarter
-
Month to date
-
Custom date range
-
-
Status
-
-
Live
-
Past
-
To filter the table:
-
In V2, go to rank promotions > testing events.
-
Click either the “filter by date” or “filter by status” button above the table.

^ Back to top
Belt inventory
Benefit of the belt inventory
The belt inventory helps studio owners know how many belts they need to order before a ranked event date.
^ Back to top
Exporting the belt inventory for a testing event
Before exporting the belt inventory for a ranked event, you will first need to add belt sizes to participants. To add belt sizes to participants:
-
In V1, go to all customers > primary customers.
-
Click on a customer name.
-
Scroll down to the participant list in the primary customer account.
-
Click the pencil icon next to a participant.
-
Click the belt size field to add belt size.


To export the list of belts needed for an event:
-
Go to rank promotions > testing events.
-
Select an event you would like to view.
-
Click the “export” button on the top right of the screen.
-
A drop down menu will appear. Click on “belt inventory.”
-
A CSV will be downloaded onto your computer or device.

Info on the belt inventory CSV
The CSV lists the belt color (title you gave the ranks), belt size, and number of participants who need each belt size.

ATA test sheet
What is the ATA test sheet?
The American Taekwondo Association (ATA) scoring sheet is used by ATA studios during scoring competitions. However, this sheet is currently available for everyone to use for general ranked events even if you’re not a part of the ATA system.
Benefit of the ATA test sheet
The ATA test sheet can benefit even non-ATA studios by serving as a roster and skill rating scale for students being tested.
Exporting the ATA test sheet
To export the ATA test sheet:
-
In V2, go to rank promotions > testing events.
-
Select an event you would like the test sheet for.
-
Click “export” at the top right of the table.
-
Select “ATA test sheet.”

Info in the ATA test sheet
The scoring sheet includes:
-
The number of participants
-
Participant’s ATA number (if any)
-
Participant first name
-
Participant last name
-
Current rank
-
Age
-
Form score
-
One-step score
-
Protech score
-
Spar scores
-
Combat score
-
Boards score
-
Total score
-
New rank
Note: A participant with multiple memberships in MyStudio will automatically have their name show up for each membership they have.

Frequently Asked Questions (FAQ)
What is a CSV file?
A CSV file is a simple type of file that stores information in rows and columns, like a spreadsheet. This type of file is commonly used in Microsoft Excel and Google Sheets.
How do I open a CSV file?
You can easily open a CSV file to see it as a table by using spreadsheet programs (like Microsoft Excel, Google Sheets, Apple Numbers, etc.). The belt inventory CSV will generally be downloaded to your “downloads” folder on your computer.
-
Open the program you would like to view the CSV file, such as Google sheets.
-
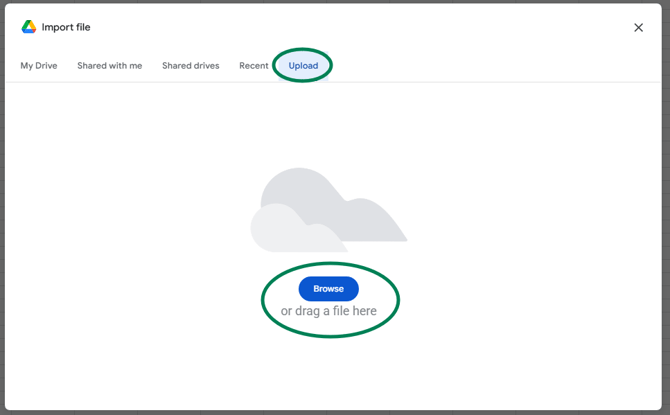
Click “file” and import the downloaded file.

Note: You may need to upload the file depending on the program. For example, in Google Sheets, after clicking “import,” you will need to go to the “upload” tab and upload the file.
^ Back to top
How do I edit the testing events?
Testing events can be edited from V1.
-
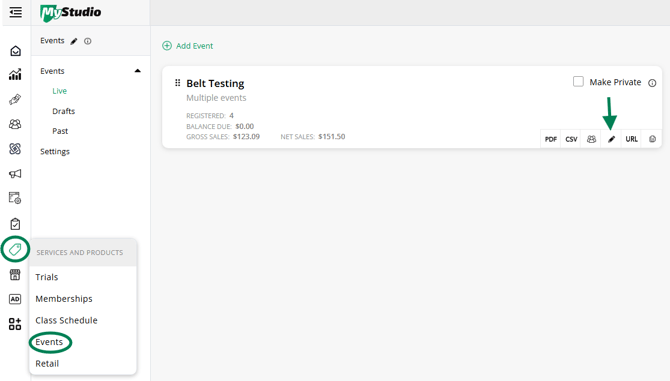
In V1, go to services and products > events.
-
Click the pencil icon on the event card you want to edit.
-
Make the changes to the set up and save.
How to edit event registrations
Event registration can currently be done in V1.
-
In V1, go to all customers > event participants.
-
Click the student name whose registration you are editing.
-
Make edits such as status updates, payment changes, etc.
^ Back to top
How to make an event into a testing event
In order to make an event a “ranked” event:
-
In V1, go to services and products > events.
-
Create or edit an event.
-
In the “details” subsection of set up, find the “is this a rank promotion event” setting.
-
Toggle this to “yes” outlined in green.
-
Finish event creation or save your edits.

Note: Creating ranked events is only available for growth and scale plans.
I accidentally made an event into a testing event. How can I change it?
In order to edit an event to not be a “ranked” event:
-
In V1, go to services and products > events.
-
Click the pencil icon on the event card to edit.
-
In the “details” subsection of set up, find the “is this a rank promotion event” setting.
-
Toggle this to “no” outlined in red.
-
Save your changes.
![]()
Can I edit the column headers in the ATA test sheet?
No, unfortunately there is no way to edit these column headers.
^ Back to top
Can I click on the event to see the registered participants without exporting anything?
The ability to do this in V2 is coming soon. However, you can still see a list of the registered participants in V2.
-
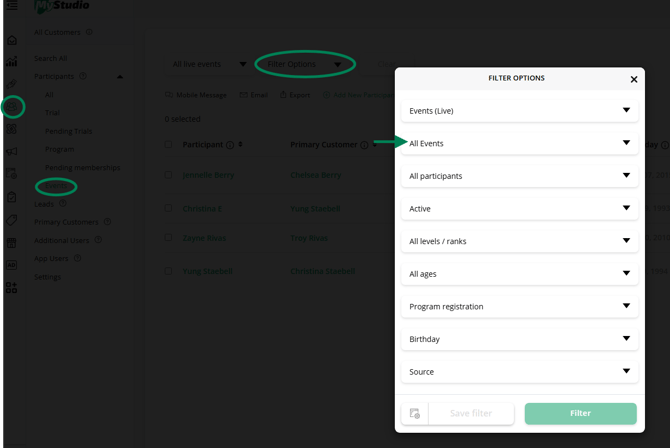
In V2, go to contacts > participants.
-
Click the “events” subtab at the top of the page
-
Filter the event participants table by the specific event and event date/option.
How to see which students have which belt sizes for a testing event
Note: A much easier method to see which students needed which belt sizes is coming soon to V2.
In order to see which students needed which belt sizes for their testing event, you will need to cross-examine the participant list and the primary customer profiles. To do so:
-
In V1, go to all customers > event participants.
-
Filter by the specific testing event and event date/option.
-
Export this list of participants and open the CSV file.
-
In MyStudio, click on the primary customer name in the table.
-
Scroll down to see the belt size info for the participant.
-
Record the information on your exported CSV file in a new column to help prepare for distributing belts at the event.
-
Continue to do this with each participant.
^ Back to top