
Updated: November 24, 2025
Table of contents
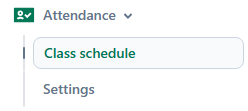
Note: This section was previously labeled "Class/Appointment Calendar" under the Operations section in V1.
In V2, it is now class "Class Schedule" and is located under the Attendance section
Permissions and accessibility
Staff access:
-
Admin: Full access
-
Manager: Full access
-
Staff: No access
MyStudio plan restrictions:
-
Waitlist manager is only available for scale plan members.
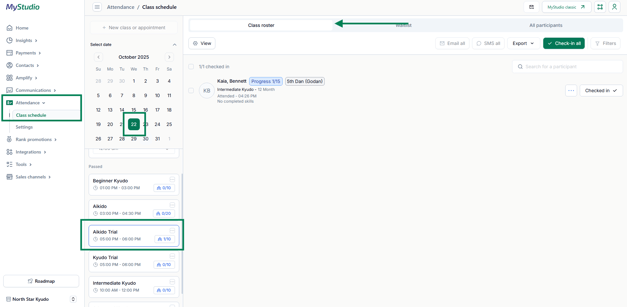
Accessing class schedule in V2
To access the class schedule in V2:
-
In V2, go to attendance.
-
Click “class schedule.”
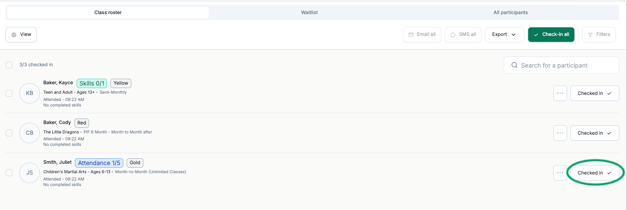
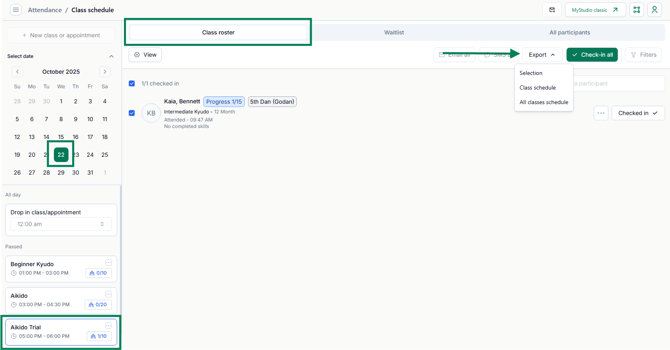
Class roster
What is the class roster section?
The class roster section shows only participants who are registered for the class you selected.
Access the class roster
- In V2, go to attendance > class schedule.
- If not looking at a roster for today, select a date on the calendar.
- Select the desired class time below the calendar.
- Click into the “class roster” section at the top.
How to check-in registered students
To check-in registered students:
- In V2, go to attendance > class schedule.
- If not looking at a roster for today, select a date on the calendar.
- Select the desired class time below the calendar.
- Click into the “class roster” section at the top.
- Click the “check-in” button next to the participant you want to log attendance.
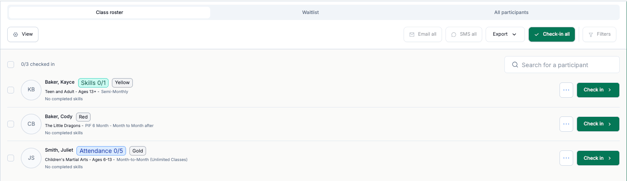
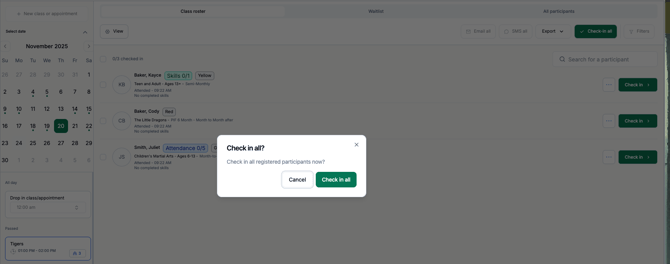
Note: You can use the “check-in all” button above the list to log attendance for the whole list instead of logging them individually.
How to undo a check-in
If you accidentally log attendance for a student, you can undo the check-in by re-clicking the “checked-in” button next to the participant.
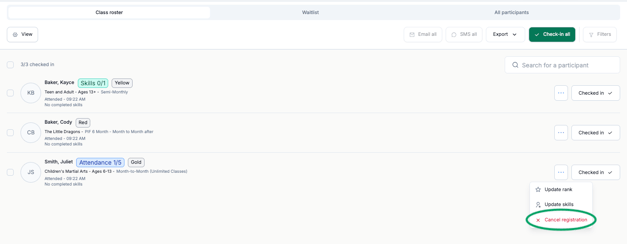
How to cancel a registration
To cancel a student’s class registration:
- In V2, go to attendance > class schedule.
- If not looking at a roster for today, select a date on the calendar.
- Select the desired class time below the calendar.
- Click into the “class roster” section at the top.
- Click the three dots next to the check-in button.
- Select “cancel registration.”
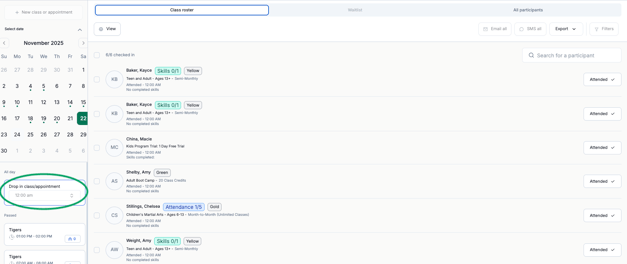
How to check-in a drop-in by time
To check in a student by drop-in time:
- In V2, go to attendance > class schedule.
- If not looking at a roster for today, select a date on the calendar.
- Select “drop-in class/appointment” from the class list below the calendar. Make sure to click the time drop-down if logging a time different than the current time (this will only work for today’s date).
- Click “mark attendance” next to the student logging the drop-in attendance.
Bulk check-in
You can use the “check-in all” button above the class roster list to log attendance for the whole list instead of logging them individually.
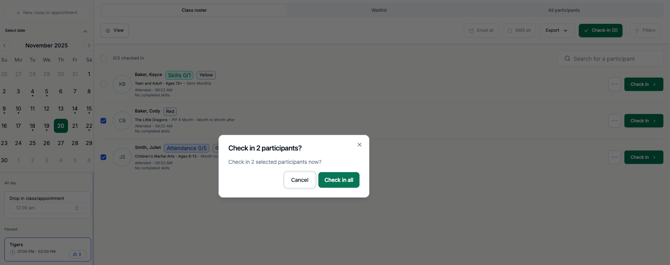
To check in some of the registrants, but not all registrants for a class:
- Check the boxes next to the desired students.
- Click the “check-in (x)” button above the list.
- This will prompt you to confirm the bulk check in for the number of selected students.
Export rosters
How to export rosters
To export a class schedule:
- Login to your V2 account.
- Go to attendance > class schedule.
- Select a date and class time.
- Click "export" above the table.
Difference between export options
There are three options for CSV export:
- Selection: will only export the schedules of the participants you selected for that particular class and time slot.
- Example: select 1 student from the Little Tiger's 5pm time > export > choose two weeks in the future. The resulting CSV will show all registrations that one participant has made for the Little Tiger's 5pm class in the next two weeks.
- Class schedule: will export the class schedule for the specific class selected over the selected date range.
- Example: export the class schedule for the Little Tiger's 5pm time for the next two weeks. The resulting CSV will show all participants registered to all Little Tiger's classes occurring in the next two weeks.
- All classes schedule: will export all class schedules for all classes over the selected date range.
- Example: export “all classes schedule” from the Little Tiger's 5pm selected class. The resulting CSV will show all participants in all classes and all times over the selected date range.
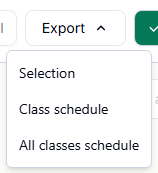
Export date range
Exporting will only allow you to export rosters from today or in the future up to 14 days. You will not be able to export a roster from a past class.

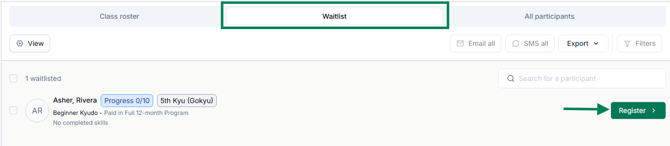
Class waitlist
What is the class waitlist?
If you’re in our scale plan and have allowed waitlists for any of your classes, the class waitlist shows the participants who have signed up for the waitlist and are waiting for a spot in a full class.
Access the waitlist
- Login to your V2 account.
- Select attendance > class schedule.
- Select a date on the calendar.
- Tap the class name listed below the calendar.
- Go to waitlist section to the right of class roster.

How to register a waitlisted participant
To register a waitlisted student for the class because a spot opened up or you want to override the capacity:
- In V2, go to attendance > class schedule.
- Select the date and class time.
- Go to the waitlist section at the top.
- Click the “register” button next to the participant.
- If capacity is still full, you may be asked if you want to override the capacity.
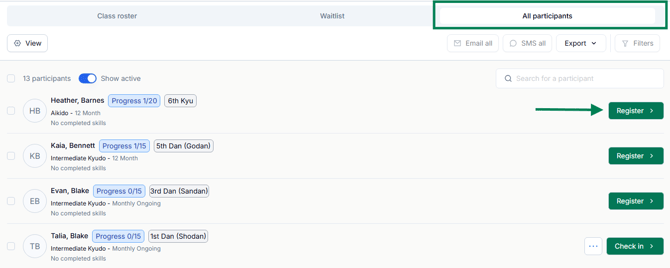
All participants
What is the all participants list?
The all participants list in the class schedule allows you to easily register participants in your system to the class you selected without having to leave the page.
Access all participants
- Login to your V2 account
- Select attendance > class schedule
- Select a date on the calendar
- Tap the class name listed below the calendar
- Go to the all participants section at the top.
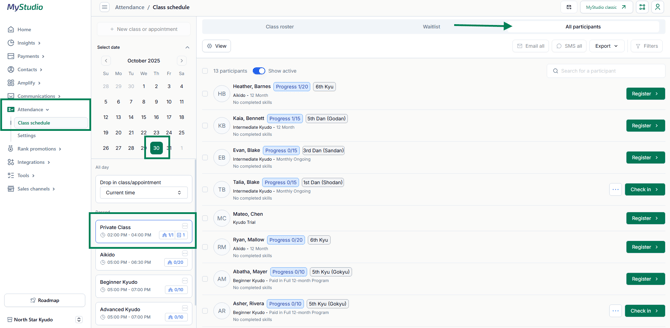
How to register participants to classes
To register a participant to a class:
- In V2, go to attendance > class schedule.
- If not looking at a roster for today, select a date on the calendar.
- Select the desired class time below the calendar.
- Click into the “all participants” section at the top.
- Click the “register” button next to the participant you’d like to register.
What is the “show active/inactive” toggle?
The “show active/inactive” toggle in the all participants subsection of the class schedule determines which students show in the all participants list.
- If the toggle is turned on (“show active”), the list of participant options will only show those who are in an active trial or membership.
- If the toggle is turned off (“show inactive”), the list will show all participants, regardless of their trial or membership registration status.

Frequently asked questions (FAQs)
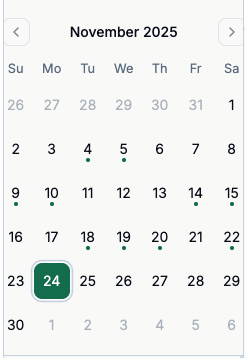
Why are there dots on the calendar?
The dots located under the dates are to show if there were registrations for that day.
How do I know if someone is on a waitlist for a class?
A class time listing will display a notes icon next to the registrant numbers on the class card if students are in the waitlist for the class.

Can I edit which pieces of information display in the list?
Yes! To edit the information that displays in the lists:
- Access the desired class schedule list.
- Click the “view” button above the list.
- Toggle which pieces of information you want to hide.
Note: the name and membership information is required to show at all times.

How do I refund a paid class?
If the student is cancelling their registration:
- In V2, go to attendance > class schedule.
- If not looking at a roster for today, select a date on the calendar.
- Select the desired class time below the calendar.
- Click into the “class roster” section at the top.
- Click the three dots next to the check-in button.
- Select “cancel registration.”
- You will then be prompted to refund the payment or just cancel the registration without refund.
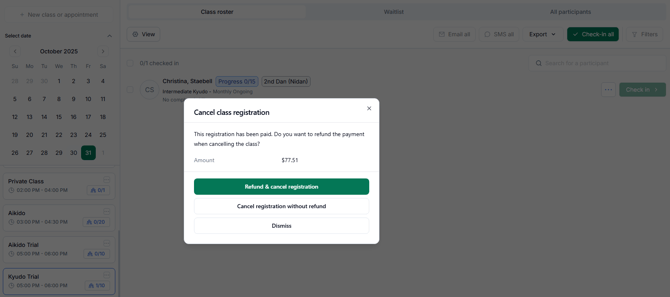
Note: if the student is not cancelling their registration, but is owed a refund, you will need to perform the refund from the payment history section in V1.
I’m getting errors when trying to check-in students
For a full list of the attendance errors and what they mean, check out our article here: V2: Attendance Portal Error Messages