
Updated: February 23, 2026
Table of contents
- Permissions and accessibility
- How to view emails
- Types of emails you can view
- How to create and send an email
- How to save a draft
- How to schedule an email
- Email table customization
- What are placeholders
- How to use or edit templates
- Image and attachment limits
- Where to see scheduled emails
- Key reminders
- Was this article helpful?
Permissions and accessibility
Staff access:
-
Admin: Full access
-
Manager: Full access
-
Staff: No access
MyStudio plan restrictions:
-
Starter: Sent message history is 14 days
-
Growth: Sent messages history is 30 days
-
Scale: Sent message history is 24 months
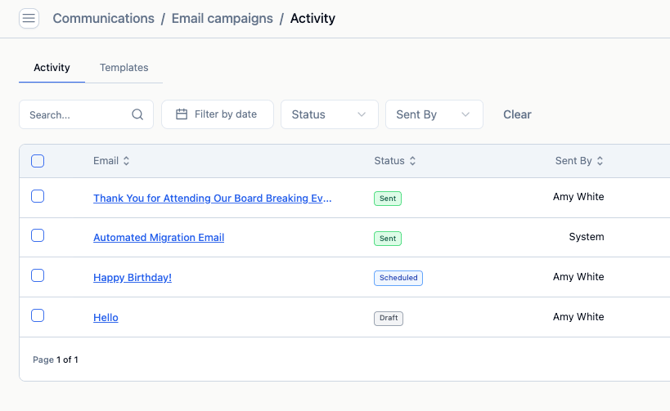
How to view emails
To see emails that are sent, scheduled, or saved as drafts:
-
Log in to your MyStudio V2 account
-
Click on "Communications"

-
Select "Email Campaigns"

-
You will see the activity page
-
Look for emails labeled as "Sent", "Scheduled", or "Draft"

Types of emails you can view
-
Sent
-
Draft
-
Scheduled
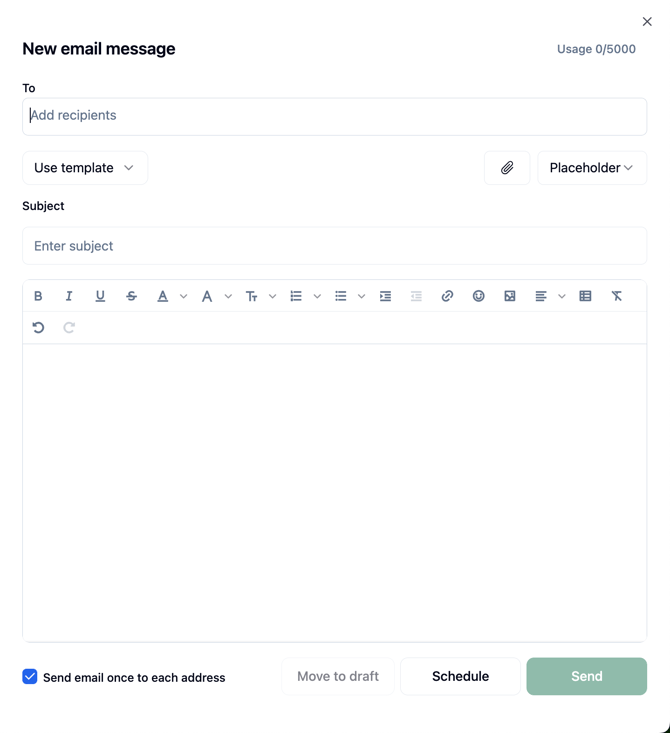
How to create and send an email
-
Click "+ Compose Email"

-
Choose who will receive the email

-
Select a template or write a subject line
-
Write the message body
-
Click the green "Send" button

You must include a recipient, subject line, and message before sending.
How to save a draft
-
Click "+ Compose Email"
-
Add a recipient
-
Add a subject line
-
Write the message
-
Click "Move to draft"

Important:
-
Drafts are not saved automatically
-
You must fill out recipient, subject, and message
How to schedule an email
-
Click "+ Compose Email"

-
Fill in recipient, subject, and message
-
Click "Schedule"

-
Choose the month, day, year, and time

-
Click "Confirm"

-
Click "Schedule Send"

Important:
-
The email is not scheduled until you click "Schedule Send"
-
You must include recipient and subject line
- Only scale plan users can edit scheduled emails
Email table customization
You can change how the email list is displayed by:
-
Turning columns on or off
-
Reordering or pinning columns
-
Changing how many emails show per page: 5, 10, 20, or 50
-
Using the search bar to find specific emails
Available columns include:
-
Email (subject line)
-
Status (sent, draft, scheduled)
-
Sent by (user or automation)
-
Recipients
-
Opened
-
Clicked
-
Unsubscribed
-
Bounced
What are placeholders
Placeholders are auto-fill tools that insert specific details into an email.

Supported placeholders for Email Campaigns:
-
Customer First Name: {primary_first_name}
-
Customer Last Name: {primary_last_name}
-
Participant First Name: {participant_first_name}
-
Participant Last Name: {participant_last_name}
-
Participant Age: {participant_age}
-
Participant Birthday: {participant_birthday}
Use placeholders in subject lines or message bodies to personalize your emails.
How to use or edit templates
To access or edit templates:
-
Log in to your V2 account
-
Go to "Communications"
-
Click "Email Campaigns"

-
Click "Templates"
To edit:
-
Choose a V2 template from the list
-
Click inside the template to make changes
To create:
- Switch from "Activity" to "Templates"

-
Click "Create New Template"

-
You will be taken to the V2 template builder
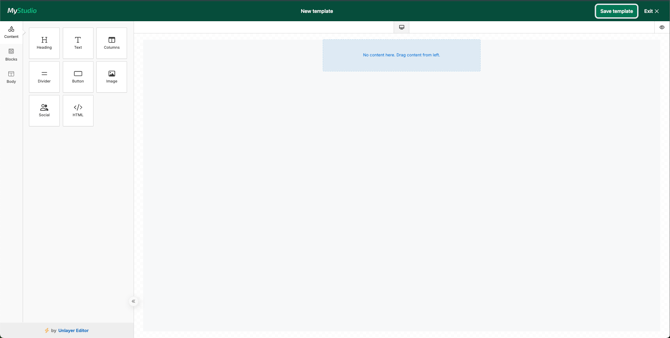
Image and attachment limits
-
Maximum image size: 5 MB
-
Allowed image formats: JPG, PNG, GIF
-
Maximum attachment size: 5 MB
-
Only one attachment per email
-
To send multiple files, use a ZIP file.
Where to see scheduled emails
-
Log in to your V2 account
-
Go to "Communications"
-
Click "Email Campaigns"
-
Look for emails labeled as "Scheduled" under the status column

Note: Editing schedule emails is only available for Scale Plan users.
Key reminders
-
You must include a recipient, subject, and message to send or save an email
-
Emails are not saved automatically
-
Scheduled emails are not confirmed until you press "Schedule Send"
-
Only Scale plan users can manage scheduled emails
-
Use templates and placeholders to save time and personalize messages