
Updated: May 26, 2026
Table of contents
Permissions and accessibility
Staff access:
-
Admin: Full access
-
Manager:
-
Has access to view trial setup
-
Does not have access to edit
-
-
Staff: No access
MyStudio Plan Restrictions:
-
None
Before you start
Have in mind what kind of trial you would like to have:
-
Free or paid
-
Trial length (days or weeks)
-
Any discounts you want to offer
-
Start date method: a specific class, open calendar, or registration date
-
Custom registration fields (optional)
-
Waiver and agreement text
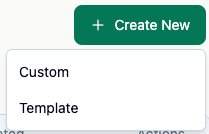
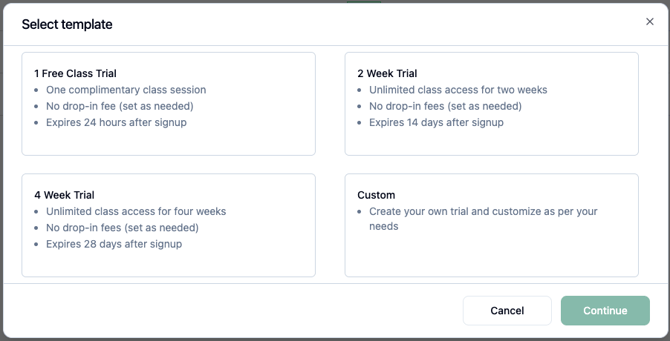
Step 1: Start a new trial
-
Go to Services and Products > Trials.
-
Select + Create New.
-
Choose Custom or Template.
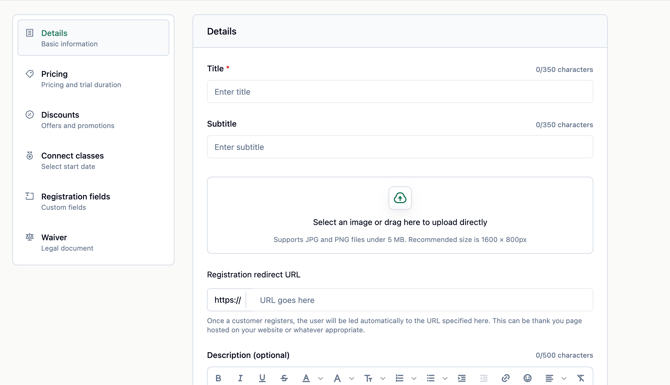
Step 2: Details
Fill out the details section:
-
Title (required): The name customers see
-
Subtitle: Extra content (e.g., age range)
-
Image: An image customers see
-
Registration redirect URL: Where customers land after registering
-
Description: Short description of what's included
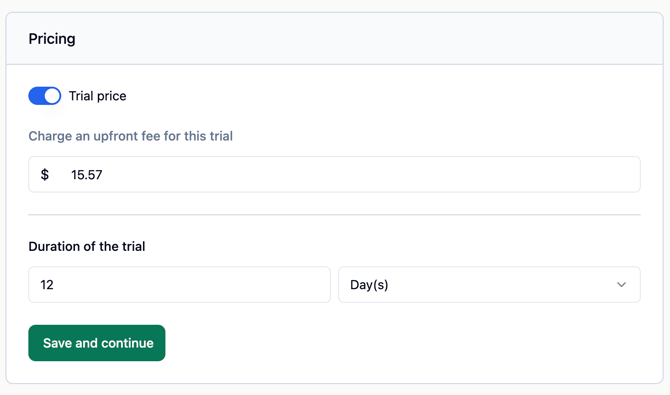
Step 3: Pricing and duration
Set the price:
-
Free trial: Keep Trial price toggled off
-
Paid trial: Toggle Trial price on
Set the duration:
-
Enter a number
-
Select day(s) or week(s)
This will be how long the customer can access the trial.
Step 4: Discounts
Discount codes are optional. Customers apply them at checkout.
To add a discount:
- Click + Add new
- Under Discount name, type in the name customers will see
- Under Discount value, enter a number
- Select % icon for percentage off, or $ sign for a dollar amount off
- Click Save
Step 5: Select start date
Pick one of the following options:
|
Option |
What happens |
|
Custom classes |
Customer picks a preselected class day and time from the calendar. The selected day becomes their trial start date. |
|
Open calendar |
Customer picks any class day and time from the calendar. The selected day becomes their trial start date. |
|
None |
Trial starts the day they register. |
Step 6: Registration fields
Registration fields collect information from customers at checkout.
System fields (first name, last name) are included by default. You can also toggle:
-
Date of birth: on or off
To add a custom field:
-
Click + Add new
-
Under Field name, enter the prompt for the customer.
-
Use the toggle to mark the field as required or optional.
-
Click Save
Step 7: Waiver
The waiver section displays terms or agreements customers must accept at checkout.
To add a waiver:
-
Click + Add new
-
Paste or type the waiver text
-
Click Save
Step 8: Publish
Once you are ready to publish the trial:
- Click Save and publish
- You will be taken to the live trials view.
Tip: After publishing, preview the trial to confirm it displays correctly. Click the three dots to the right of the trial, then click Preview.
Related articles
Still need help? Contact your MyStudio account manager or reach out to our support team.