
 V2 is here — no action needed. Your software has already been updated at no extra cost. Take advantage of a faster, more powerful email experience with a drag-and-drop template builder, smarter scheduling, and built-in tracking. See V2 Email campaigns and V2 Email template builder to get started.
Overview
MyStudio has three main ways that you can send communications to your members - email, in-app messages, and SMS. Maintaining communication is important in both retaining members and marketing your products.
Permissions and Accessibility
Staff Access:
- Admin
- Full Access
- Manager
- Full Access
- Staff
- No access
MyStudio Plan Restrictions:
- To use emojis in emails, you must have the communication enhancement add-on
- There are a few differences with email functionality based on your MyStudio plan
|
Starter |
Growth |
Scale |
|
|
Bulk emails per day |
500 |
2000 |
5000 |
|
Custom Email Templates |
3 |
Unlimited |
Unlimited |
Specifications
Drafting Emails
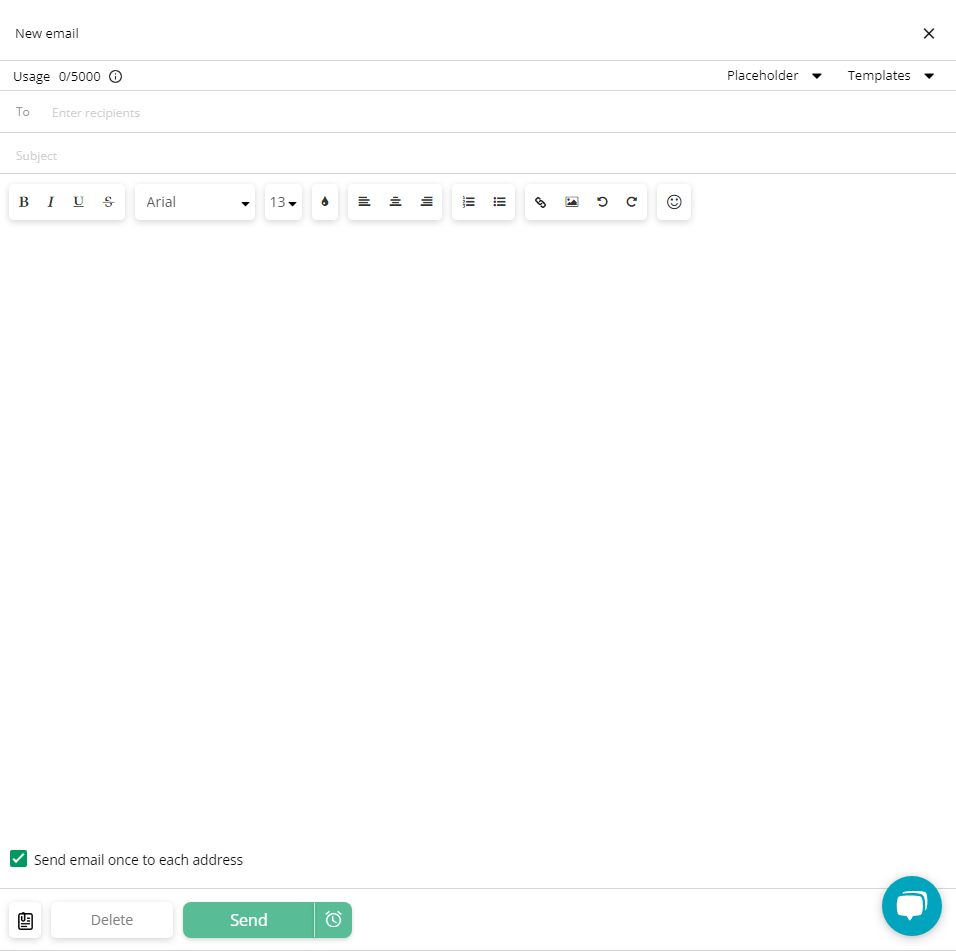
When typing up an email, you will see the following settings:
- Usage: This shows how many bulk emails (2+ recipients) you have sent compared to how many you are allowed per day. The allowance is based on your MyStudio plan.
- Placeholder: Placeholders allow you to customize an email by having the system auto-fill information based on the placeholder you put in the subject or body of the email. See further down for more details on these different placeholders.
- Templates: Templates save you time in drafting emails. You can create a custom template ahead of time so that when you are ready to send that type of email, you can simply choose it from the template list and send. The amount of custom templates you can create is determined by your MyStudio plan. See further down for more details on templates.
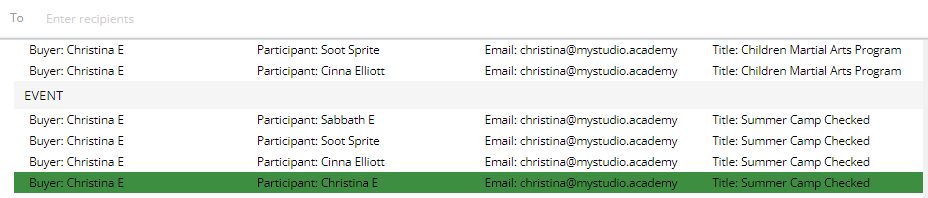
- Recipients: If you are sending an email to a specific person from within their buyer or participant profile or by checking their name in the All Customers list first, this will auto-populate with the recipient. Otherwise, you can begin typing the email in order to pull up a list of your members to choose from.
- Images: You can add images with JPEG, PNG, or GIF file types to emails. Images must be less than 5MB
- Emojis: You are able to add emojis to the body of emails as long as you have the communication enhancement add-on.
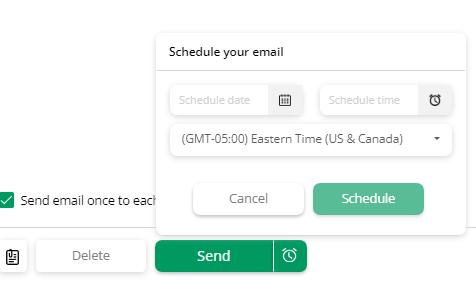
- Send email once to each address: In order to reduce sending duplicate emails to the same recipient, you can check the “Send email once to each address” box. This is especially useful when sending an email to your whole program participants list in case a family has multiple participants registered.
- Attachment (paper icon): You can attach one item to emails. This can include images, PDF files, and other documents. Attachments must be less than 5MB
- Timer icon: You can schedule emails to send at a later date and time instead of sending it right away.
Placeholders
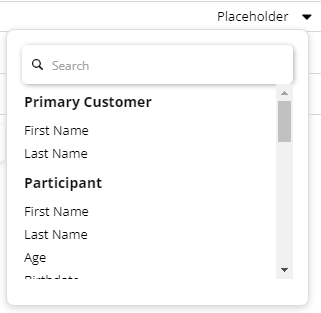
Placeholders allow you to customize an email by having the system auto-fill information based on the placeholder you put in the subject or body of the email. The placeholder options are as follows:
- Primary Customer: This can be used from all email locations
- First Name
- Last Name
- Participant: This can be used from all email locations
- First Name
- Last Name
- Age
- Birthdate
- Leads fields: We recommend using this when sending emails only from All Customers > Leads or lead automations. Otherwise, the placeholder may be blank because the system doesn’t know what information to grab from.
- Program interest: This is selected while filling out the lead form
- Status: This will include custom statuses made
- Trial fields: We recommend using this when sending emails only from All Customers > Trial Participants or from trial automations. Otherwise, the placeholder may be blank because the system doesn’t know what information to grab from.
- Status: This will include custom statuses made
- Program: Title of the trial
- Start Date
- End Date
- Membership fields: We recommend using this when sending emails only from All Customers > program participants or program automations. Otherwise, the placeholder may be blank because the system doesn’t know what information to grab from.
- Status
- Membership Program
- Membership Option
- Rank
- Next Payment date
- Next Payment amount
- Bill past due
- Start Date
- End Date
- Events fields: We recommend using this when sending emails only from All Customers > event participants or event automations. Otherwise, the placeholder may be blank because the system doesn’t know what information to grab from.
- Event Title
- Event category
- Event Start date
NOTE: For lead, trial, membership, and event placeholders, you can use these placeholders when sending the email from a different section than the ones recommended, but you will need to choose the correct recipient listing type. For example, if you want to use event fields but you are sending the email from the general email icon, you will need to scroll down the recipients list and choose someone under the “Event” title.
Templates
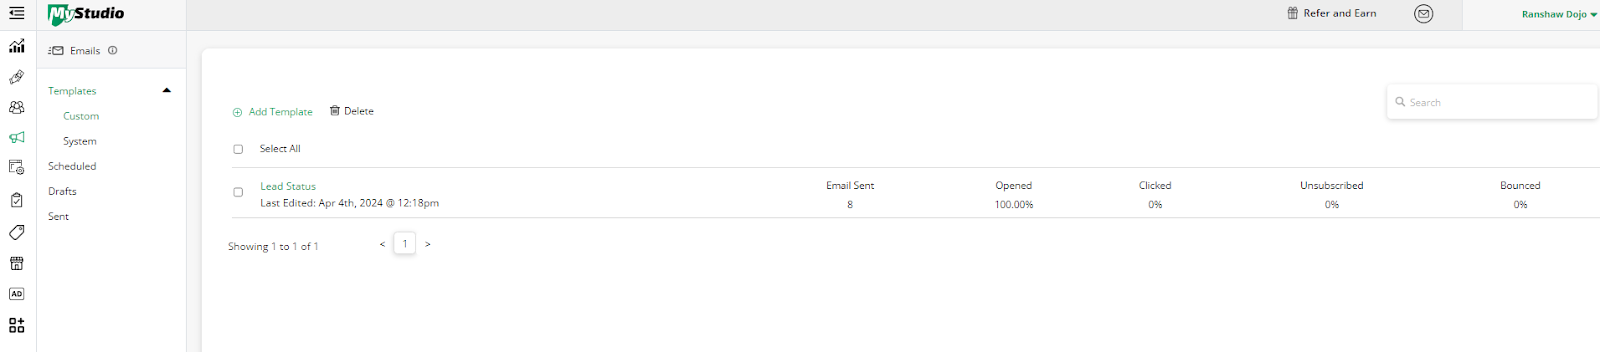
Email templates help you save time when drafting communication. In Communications > Emails, you will find the template section in which you can view a list of pre-made system templates, or you can create custom templates. To create a template, click into the Custom Templates section and click “Add Template.” Then you will simply name the template and draft the subject line and email body. Once completed, click save.
You can also delete a custom template by checking the box and clicking “delete” above the table. There is more important information attached to the template on this page. You can see when the template was last edited below the title. To the right you can see how many times the email template was sent in general, how often it was opened, how often it was clicked on, and how often the recipient unsubscribed from that email or the email bounced.
Scheduled Emails
You can schedule emails to send at a later date and time instead of sending it right away by clicking the clock icon at the bottom of the email. You can access scheduled emails from communications > emails > scheduled. From this section you can click on the email to view its contents or cancel the scheduled send time and move it to the drafts section. You can also check the box next to the email and delete it.
Drafts

Emails will auto-save in the system as you are typing them out. Because of this, if you were to exit out of the email creation process without sending or scheduling the email, it will appear in the drafts section in communications > email > drafts. On this page, you can click on an email to continue editing it, or you can check the box next to the email to delete it. Drafts are kept in accordance with your MyStudio plan.
Sent
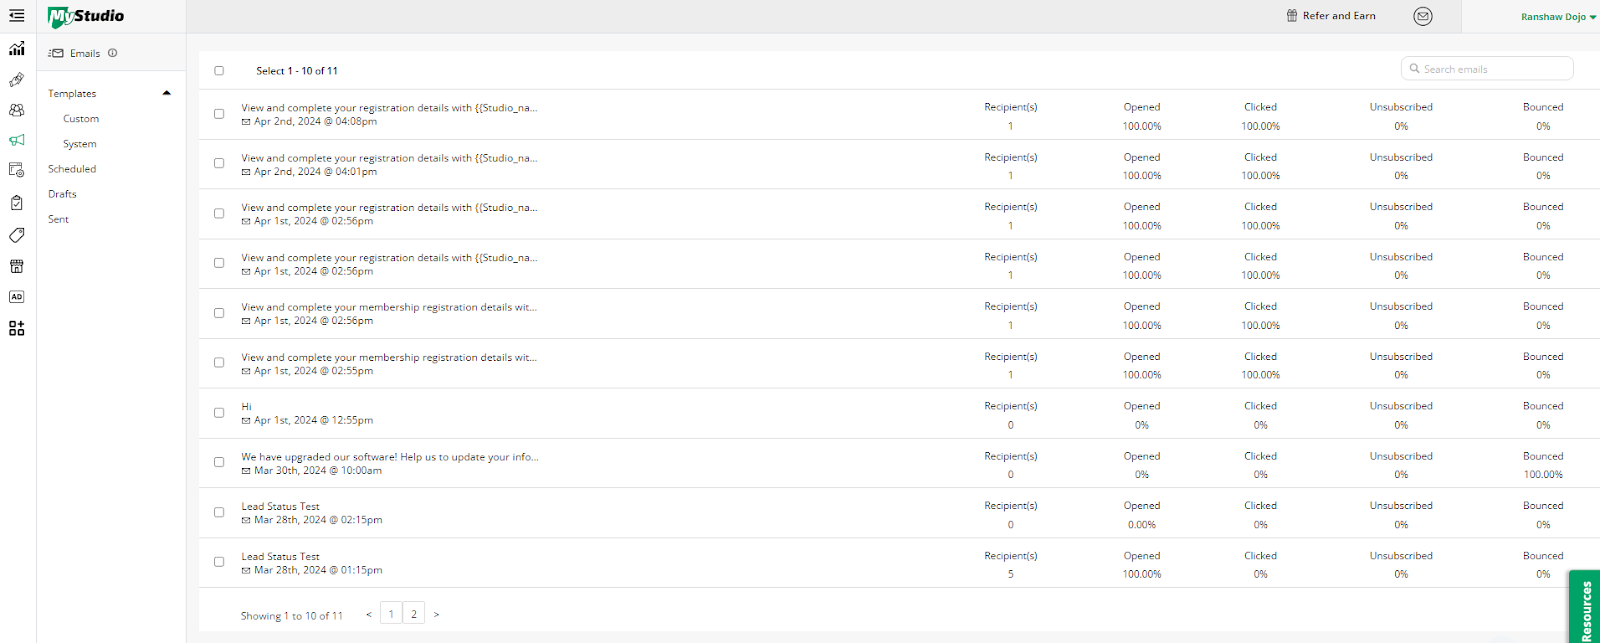
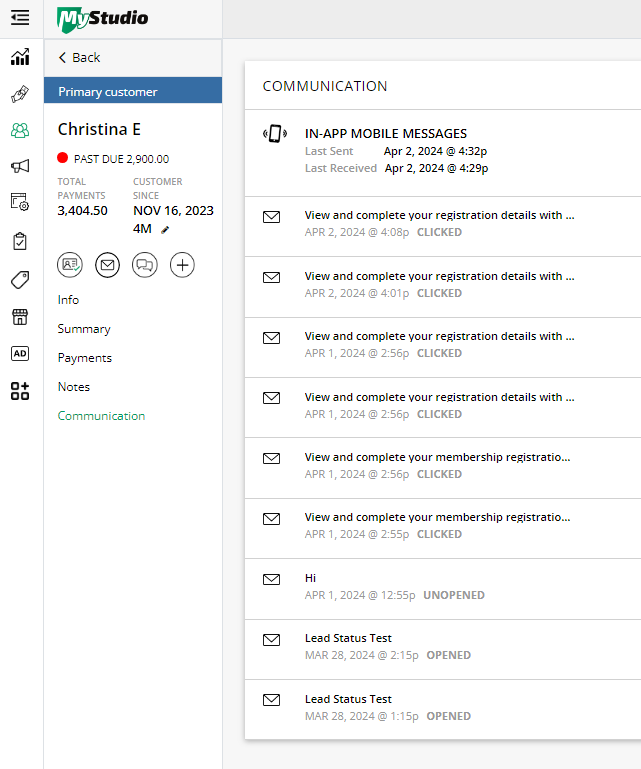
Once an email has been sent, it will appear in communications > emails > sent. This page also displays important data for the percentages of recipients who have opened, clicked, unsubscribed, or bounced. You can also check the box to delete a sent email from your sent listing. Additionally, you can view sent communications from within the primary customer account by going to All Customers > Primary Customers > Click into a name > Communications.
The duration of which sent emails are stored in MyStudio depends on your MyStudio plan. Within the communications section, history is as follows:
- Starter: Not available
- Growth: 30 days
- Scale: 30 days
- Trial plan: 30 days
- Legacy/White Label/Premium: 14 days
Note: If you know one of the recipients of the communication, you are able to also view communication history from the primary customer profile. This history shown is different for plans than the communications section itself. Profile communication history is as follows:
- Starter: 14 days
- Growth: 30 days
- Scale: 24 months
- Trial plan: 30 days
- Legacy/White Label/Premium: 14 days
All Sending Locations
Emails can be sent from many points in your system:
- Email icon at the top right: you will need to type out recipients
- Payments > Payment history > click on the email: will send only to this recipient, but you can enter more
- Payments > Pending > click on the email: will send only to this recipient, but you can enter more
- Payments > Past due > click on the email: will send only to this recipient, but you can enter more
- Payments > Upcoming > click on the email: will send only to this recipient, but you can enter more
- All Customers > Search: will send to only those you check
- All Customers > All Participants: Use this if you need to send a message to everyone except leads and app users (those who have accessed the app but have not made any registrations or purchases).
- All Customers > All Participants > click into a participant profile > email icon below their name: use this if you need to send a message only to the contact of this individual
- All Customers > Trial Participants: Use this if you need to send a message to only trial participants. You can also send an email from the internal registration of one participant
- All Customers > Pending Trials: Use this if you need to send a message to only trial participants that you are waiting to complete their trial registration.
- All Customers > Program Participants: Use this if you need to send a message only to program participants. You can also send an email from the internal registration of one participant
- All Customers > Pending memberships: Use this section if you need to send a message to only migrated members who have not updated their payment details yet. You can also send an email from the internal registration of one participant
- All Customers > Event Participants: Use this if you need to send a message only to event participants. You can also send an email from the internal registration of one participant
- All Customers > Leads: Use this if you need to send a message only to your leads. You can also send an email from the internal registration of one participant.
- All Customers > Primary Customers: Use this if you want to send a message to all main contacts of participants who are not leads or app users (those who have accessed your app but have not made any purchases or registrations).
- All Customers > Primary Customers > click on the buyer name: use this if you need to send a message only to this particular contact.
- All Customers > Additional Users: Use this section if you want to send a message to all secondary contacts of a participant.
- All Customers > App Users: Use this section if you want to send a message to only app users (those who have accessed your app but have not made any purchases or registrations)
- All Automations have an email option
- Operations > Class Appointment Calendar > Click to see a roster: Use this section if you want to send an email to participants of a particular class time
- Sales Channel > Customer Access > Email access directions: Use this section if you want to specifically send an email with instructions on how to download and access the member app.
NOTE: All points of sending a mobile message also have the option to send an email along with the mobile message.