
Table of contents
- Permissions and accessibility
- Table
- Filters
- Trial registration internal pages
- Trial
- Details
- Payments
- Attendance
- History
Permissions and accessibility
Staff access:
- Admin
- Full access
- Manager
- Full access
- Staff
- No access
MyStudio plan restrictions:
- None
Table
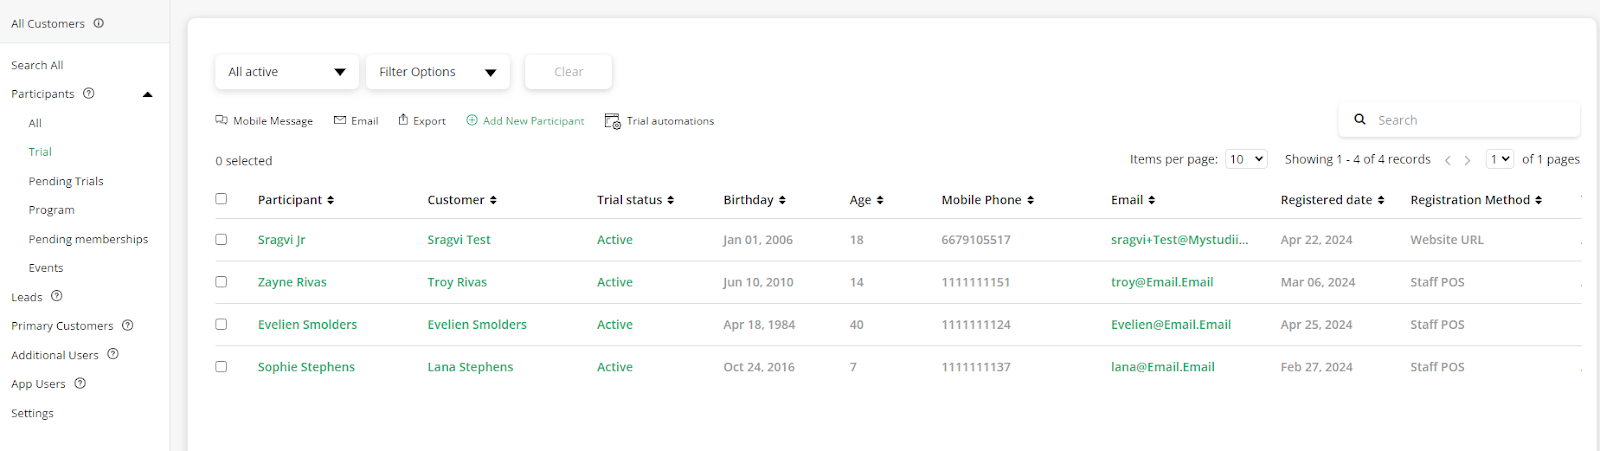
Access your trial participants from all customers > trial participants. Here you will see a list of all active trial members. The table will show you the following information:
- Participant name: clicking this will redirect you to the trial registration internal page
- Customer name: clicking this will redirect you to the primary customer account
- Trial status: clicking this allows you to change the status directly from the table
- Birthday
- Age
- Mobile phone number
- Email: click on this to open the email creation
- Registered date: the date they registered for the trial
- Registration method
- Trial program
- Start date
- End date
- Source
- Paid marketing id: if source was Google ad or Facebook pixel
- Last attendance
- Attendance count
- Attendance last 14 days
- Attendance last 30 days
Above the table there are several actions you can take:
- Apply filters
- Send mobile message
- Send email
- Export trial list
- Add new participant to a trial
- Trial automations: redirects you to trial automation templates
- Delete: this will delete the registration, not the participant. This option only appears if only one participant is selected.
Filters
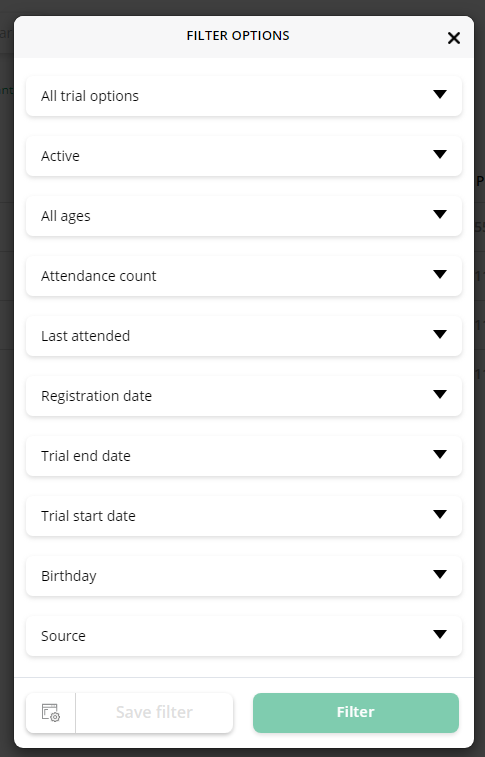
Above the table and table actions there are two drop downs for filtering the trial participants list. The first one contains default or custom saved filters. The default filters include:
- All active
- Trial ending (in next 30 days): displays list of participants whose trial ends in the next 30 days
- Trial registrations (month to date): displays list of participants who have registered for the trial within the current month
- Zero attendance (last 14 days): displays list of active participants who have no attendances in the last 2 weeks
You can manage saved filters by clicking “manage filters.”
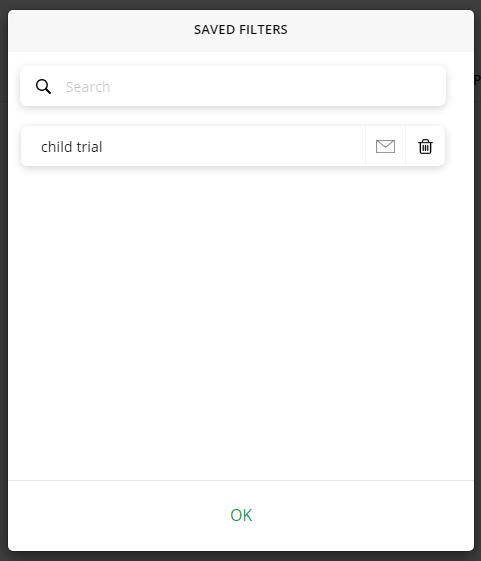
This will bring up a list of your saved filters. Click the email icon to make edits to the name or email filter report option. Click the trash can icon to delete the saved filter.
The second drop-down contains the specific filters you can apply. These filters include:
- Trial
- Status
- Active
- Enrolled
- Canceled
- Did not start
- Deleted
- Custom statuses
- All
- Age
- All ages
- Custom ages: enter an age range and an “as of” date
- Attendance count: specifies a specific number of attendances
- Do not specify
- Attended
- Range type:
- Exactly
- Less than or equal to
- More than or equal to
- Number of attendances
- Time frame:
- Within last 7 days
- Last 14 days
- This month: month to date
- Last month
- Date range
- Range type:
- Last attended: only accounts for their most recent attendance
- Do not specify
- Within last 7 days
- Last 14 days
- This month: month to date
- Last month
- Date range
- Registration date
- All
- Month to date
- Last month
- Last 60 days
- Date range
- Trial end date
- Do not specify
- Ending this month
- Ending next month
- Ending in 60 days
- Date range
- Trial start date
- Do not specify
- Starting/started this month
- Starting next month
- Starting in 60 days
- Date range
- Birthday
- Do not specify
- Today
- This week
- This month
- Custom
- Date range
- Source
- Member referral
- Google: selected from “how did you hear about us” options
- Facebook: selected from “how did you hear about us” options
- Studio location
- Google ad: from your Google ad link
- Facebook ad: from your Facebook ad link
If you find yourself selecting the same filters frequently, we recommend saving the filter by clicking “save filter” at the bottom of the filter list.
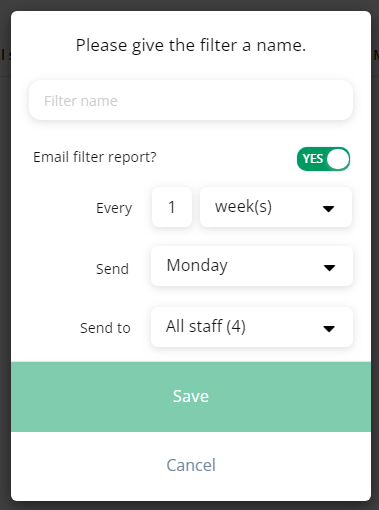
When you do, you will be prompted to give the saved filter a title and whether you would like to receive an email report about the filter periodically.
If you select “yes,” you will ended to select the following:
- How often you would like to receive the report: x number of weeks or months
- When it will send: which day of the week or month
- Who will receive the report: this follows your staff list in my account > users and permissions
Once saved, you will also be asked if you would like to set up the filter as a custom automation! These automations are great for sending automation communication to the participants that fit the filter criteria. For example, you can create a custom campaign to send a happy birthday message using the birthday filter.
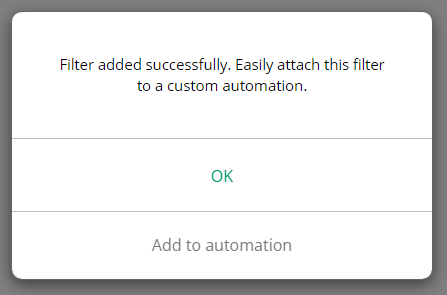
To add the saved filter to an automation, click “add to automation” and you will be redirected to the custom automations set up.
Trial registration internal pages
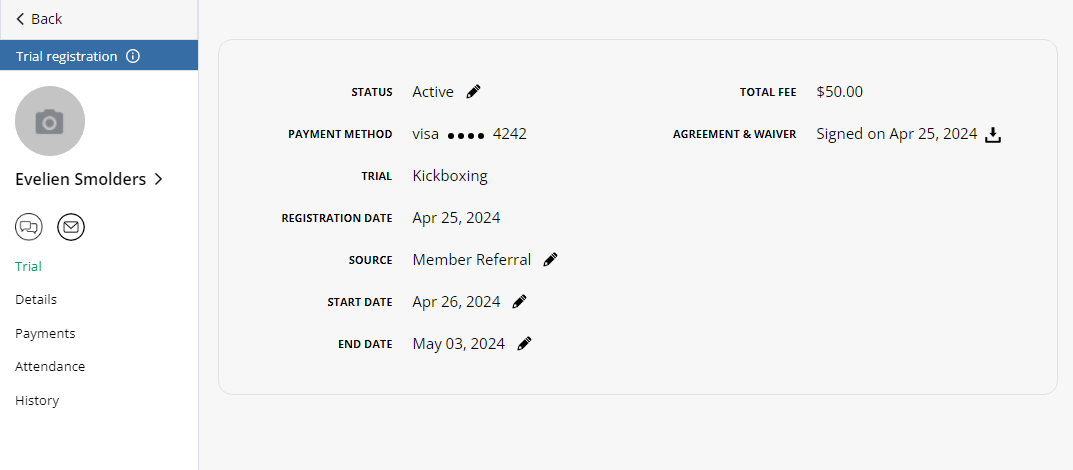
If you click on a participant name from the trial participant’s table, you will see the trial registration internal page. Here, you will see the following items on the left:
- Participant photo: clicking this will prompt you to be redirected to the participant account in order to update the photo
- Participant name: clicking this will redirect you to the participant profile
- Mobile message icon
- Email icon
- Trial: presents information about the trial registration
- Details: displays custom participant and registration fields
- Payments: payment history pertaining to the trial registration
- Attendance: displays attendance attached specifically to the trial
- History: prompts you to be redirected to the participant account in order to see participant notes
Trial
The trial page shows information about the trial registration. This includes:
- Status: click the pencil to edit the status to
- Custom statuses: please note that custom statuses still count as the trial being "active"
- Enrolled: this has a positive effect on your analytics. Indicates the student registered for a membership
- Canceled: this has a negative effect on your analytics. Indicates the student utilized the trial and attended but decided to not register for a membership. Canceling a trial registration will not prompt a refund, but you can still issue one afterwards in the payments subsection.
- Did not start: this has a negative effect on your analytics. Indicates the student did not attend or utilize their trial, but also decided to not move forward with your business
- Payment method: “manual” indicates trial was paid for with cash or check. CC will display type of card and last four digits.
- Trial
- Registration date
- Source: click the pencil to edit the source
- Start date: click the pencil to edit the start date
- End date: click the pencil to edit the end date. If the end date passes, it will not automatically change the status of the trial registration, but you can set up a trial automation to do so.
Note: the attendance limits for a trial is dependent on the trial program length. For example, if the trial has a length of 7 days, students are allowed 7 attendances. However, if you edit the end date to a more future date, this will not affect the attendance limits if they have already used all their attendances.
- Total fee
- Agreement & waiver: click the download button to download a copy of the signed waiver
Details
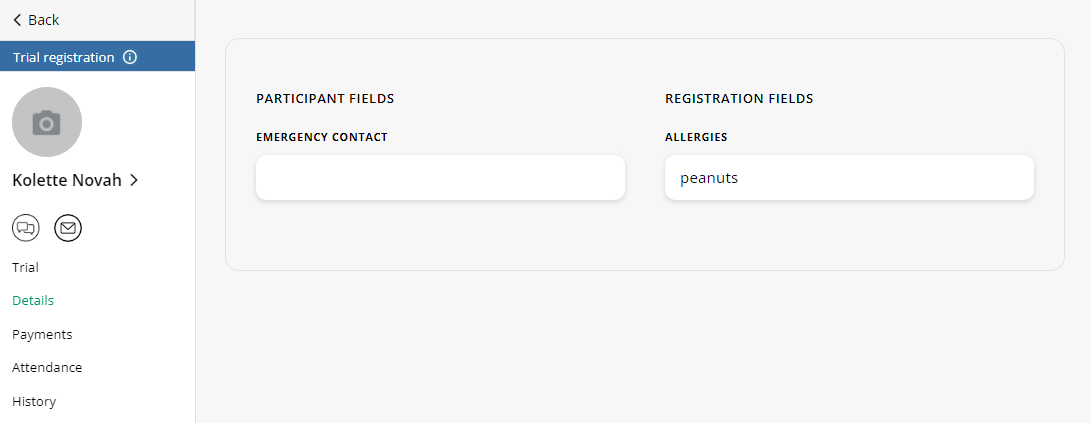
The details page displays the custom participant fields set up in all customers > settings as well as the custom trial registration fields set up in services and products > trials > edit the trial > registration fields. Clicking on the participant field will redirect you to the participant profile to edit the information. Clicking on the registration field will allow you to edit directly from this page.
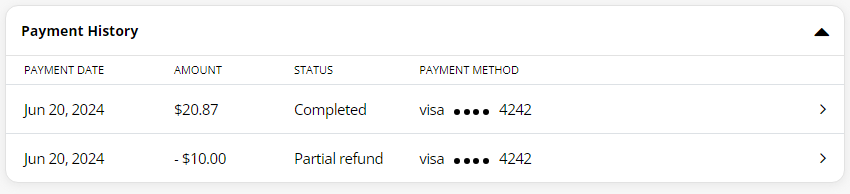
Payments
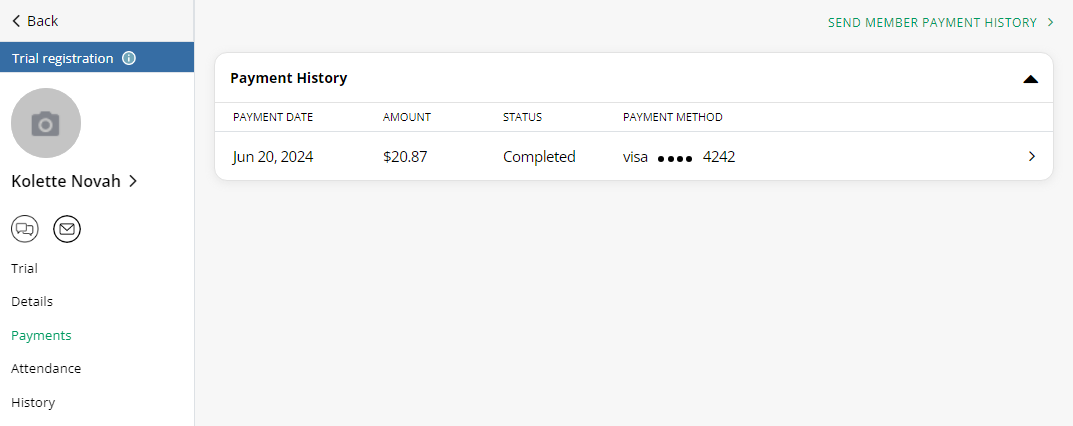
The payments section in the trial registration internal page will show you the payment history for that specific trial registration. You can send this payment history to the customer by clicking “send member payment history” at the top right.
Clicking on the payment history transaction will show you the total (including the breakdown of taxes and fees) and the payment method.
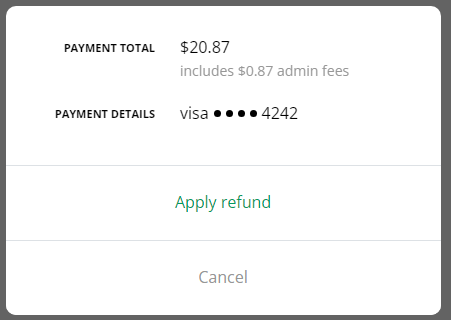
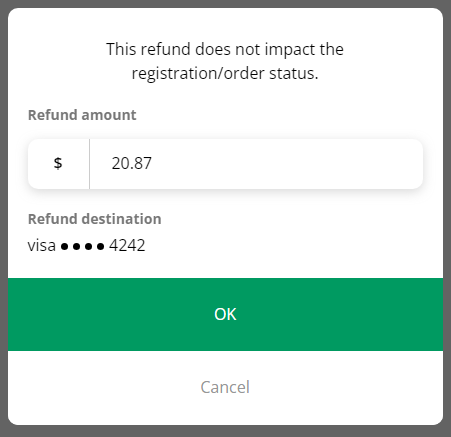
You can refund the payment from this selection. When applying for a refund, you can enter the full amount, or type in a partial refund. In either scenario, refunds will not impact the status of the registration.
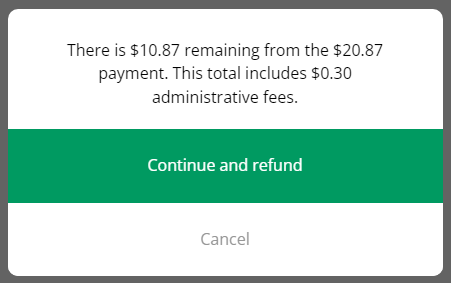
Typing in a partial refund will then show you a summary of the remaining payment with a breakdown of admin fees and taxes.
Refunds will also display in the payment history list, and you can click on this item to see the breakdown of the total refund, which payment was refunded, how it was refunded, and when it was refunded.
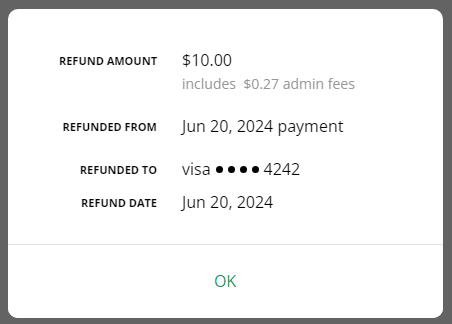
You can complete as many additional refunds on a remaining total later.
Attendance
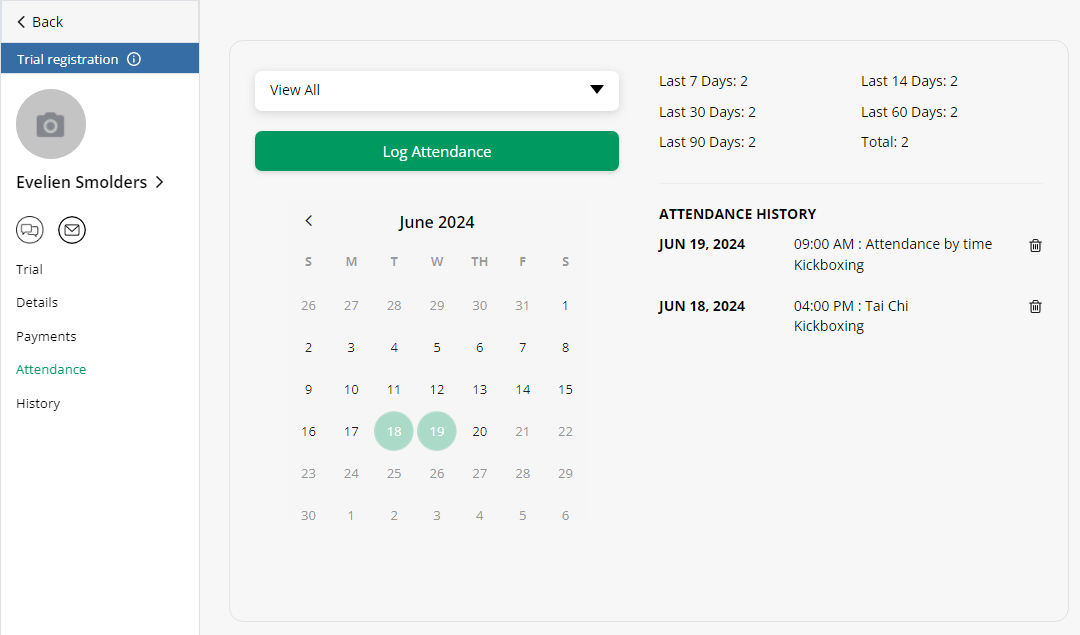
The attendance section will automatically display the attendance for the specified trial. You can log an attendance or delete one from this section. If the attendance is by time and not connected to a specific class, it will be displayed as a drop in, which you can filter to from the drop down.
For more information on attendance, check out our article here: All Participants.
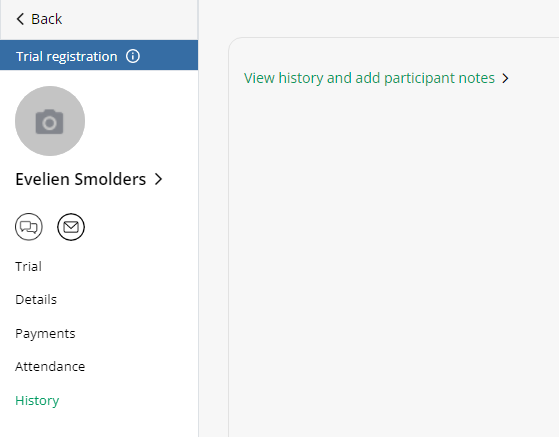
History
The history section will only redirect to the participant profile > notes section. For more information on this section, check out our article: All Participants.