
Updated: January 7, 2026
Table of contents
Note: If you're looking to create a report, this is done by saving a filter.
Permissions and accessibility
Staff access:
-
Admin: Full access
-
Manager: Full access
-
Staff: No access
MyStudio plan restrictions:
-
None
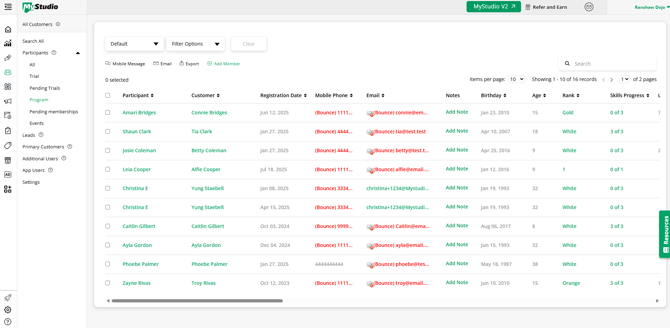
List of active program participants
To access a list of your active program participants:
- Login to the MyStudio control panel.
- Go to all customers.
- Click “programs” under the participants subcategory on the left.
This table will default to showing you a list of only active participants in all memberships, but you can utilize the filters at the top to see specific lists.
Here is a picture of what to look for:
Program participant table functions
How to see a list of specific participants
To see a specific list of participants:
- Go to all customers.
- Click “programs” under the participants subcategory.
- Click “filter options” above the table.
- You will see a full list of filters you can apply to the table and save for easier access later.
Here is a picture of what this looks like:

How to save a filter (generate a report)
To save a filter for a list of participants:
- Go to all customers.
- Click “programs” under the participants subcategory.
- Click “filter options” above the table.
- Choose the filters and click “save filter.”
- Name the filter and choose whether the system will send you and/or your staff an email report with the filter information in a specified time.
- Choose whether to set up the filter as a custom automation to send communications to the participant list.
Looking to generate a report?
In this system, saving a filter is how you create and receive participant reports. When you save a filter, you can also choose to receive scheduled emails with that filtered data — just like a report.
You can manage saved filters by clicking the drop down next to the filters list and clicking “manage filters.” Here are pictures of what to look for:

How to see who hasn’t attended classes
To see a list of who hasn’t been attending classes in a specified time:
- Go to all customers.
- Click “programs” under the participants subcategory.
- Click the filter options drop down above the table.
- Find the “attendance count” filter and select “attended exactly 0 times” within the time frame you are looking for.
- Save the filter for easy access in the future by clicking save filter and following the save prompts. You can even opt in to a report emailed to you for this filter.
Here is a picture of what to look for:

How to send communications to program participants
To send communications to program participants:
- Go to all customers.
- Click “programs” under the participants subcategory on the left.
- Filter the table as desired.
- Check the box next to some or all of the active participants.
- Select the email or mobile message icon above the table.

If you want to send communications to a specific participant, you can also click on the participant’s name to access the program registration page and select the email or mobile message icon under their name.
How to add program participants
To add additional program participants:
- Go to all customers.
- Click “program” under the participants subcategory on the left.
- Above the table click “add member.”
- Click “add new member.”
- Select the program category and option before continuing.
- You will then be redirected to the POS to finish registration.
Here are pictures for what to look for:

How to migrate members
If you need to migrate a singular or list of members into the system:
- Go to all customers.
- Click “programs” under the participants subcategory.
- Click “add member” above the table.
- Select “migrate existing members.”
- Choose whether to migrate members individually or import a CSV list of members.
For more information on the migration process, check out our article: Membership Migration.
Here is a picture of what to look for:

How to delete a registration
To delete a program registration:
- Go to all customers.
- Click “programs” under the participants subcategory.
- Check the box next to one participant.
- Click “delete” at the top above the table.
Note: Participants must be in a canceled status before a program registration can be deleted. This method deletes only the program registration, not the participant themselves.

How to access a participant's program registration profile
To access a participant's program registration profile for more actions:
- Go to all customers.
- Click “programs” under the participants subcategory.
- Click on a participant’s name to access that program registration profile.
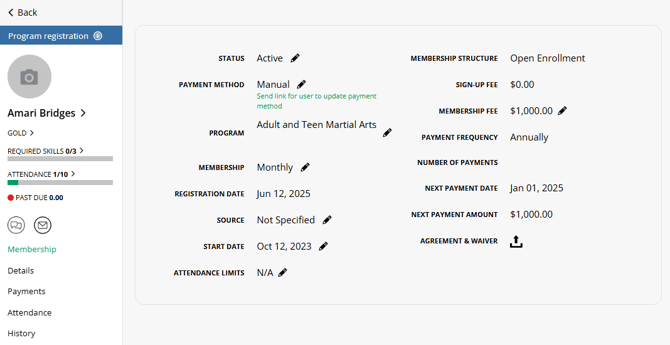
Participant registration profile actions
How to change a program status
To change the status of a program registration:
- Go to all customers.
- Click “programs” under the participants subcategory.
- Click the participant’s name to access the program’s internal registration page.
- Click the pencil next to the status.
- Choose the status you want to change it to.
- Choose whether the status change occurs immediately or in the future.
Note: Cancelled/completed memberships cannot be reactivated.
Here’s a picture of what to look for:

How to schedule a hold
To schedule a membership to go on hold:
- Go to all customers.
- Click “programs” under the participants subcategory.
- Click the participant’s name to access the program’s internal registration page.
- Click the pencil next to the status and change to “on hold.”
- From the first drop down, choose “schedule payment pause date.”
- Select which payment date the membership will go on hold. The program will go on hold without taking a payment on that day.
- Choose whether this hold is indefinite until manually changed, or schedule a resume date.
Here are some pictures for what to look for:

How to schedule a cancellation
- Go to all customers.
- Click “programs” under the participants subcategory.
- Click the participant’s name to access the program’s internal registration page.
- Click the pencil next to the status and change to “cancelled.”
- From the drop down, choose “select last payment date.”
- The first date drop down will be the last payment date.
- The second date selection will be the last day the member will be active. This allows you to have the student make a last payment but continue to attend classes for the rest of the month.
If you need to edit these dates, you can do so from the participant profile. Here are pictures to look out for:

How to update the membership payment method
To update the membership’s payment method from the control panel:
- Go to all customers.
- Click “programs” under the participants subcategory.
- Click the participant’s name to access the program’s internal registration page.
- Click the pencil next to the payment method
Alternatively, for step 4, you can click the link before the payment method that says “send link for user to update payment method.” This will send an email to the customer for them to update the payment method from their end.
Here is a picture of what to look for:

How to edit the membership registration start date
To edit the membership start date:
- Go to all customers.
- Click “programs” under the participants subcategory.
- Click the participant’s name to access the program’s internal registration page.
- Click the pencil next to the membership start date.
This date can be any date in the past.
Here is a picture of what to look for:

How to edit the membership registration end date
To edit the membership end date:
- Go to all customers.
- Click “programs” under the participants subcategory.
- Click the participant’s name to access the program’s internal registration page.
- Click the pencil next to the membership end date.
Here is a picture of what to look for:

How to edit attendance limits
To edit attendance limits:
- Go to all customers.
- Click “programs” under the participants subcategory.
- Click the participant’s name to access the program’s internal registration page.
- Click the pencil next to the attendance limits.
Important: If attendance limits is N/A and you add limits, you will not be able to revert it back to N/A.
Here is a picture of what to look for:

How to edit a membership fee
To edit the membership fee for an open enrollment membership:
- Go to all customers.
- Click “programs” under the participants subcategory.
- Click the participant’s name to access the program’s internal registration page.
- Click the pencil next to the membership fee. This will redirect you to the program’s payment section.
- Click the upcoming payment
- Click “edit membership fee details.”
- Edit the fee and/or the next payment date.
This edit will affect all future payments for this membership type.
Important: You cannot edit a $0 membership fee.
To edit the membership fee for other membership types:
- Go to all customers.
- Click “programs” under the participants subcategory.
- Click the participant’s name to access the program’s internal registration page.
- Go to the payments subsection on the left side menu in the program internal registration page.
- Click the upcoming payment.
- Click “edit payment.”
- Edit the fee and/or the next payment date.
- Select whether edits to the fee will affect only the payment you selected or the rest of the future payments as well.
Here are pictures of what to look for:

Note: Payment frequency cannot be edited. If you need it changed you will either need to cancel the current membership fee and add additional payments or cancel the registration and re-register with the correct frequency.
How to mark a skill as completed
If your program ranks have skill mastery requirements, you can mark these as completed for a student by:
- Go to all customers.
- Click “programs” under the participants subcategory.
- Find the participant and scroll the table to the right till you see the skill progress column.
- Click on the green numbers to pull up a list of the skill requirements.
- Click “complete” next to any of the completed skills.

You can also find this in the program registration page. From the program participant’s list, click the participant’s name, and access the skill list by clicking the progress bar under the participant’s name in the internal registration page.

How to transfer to a different membership
If a student needs to be transferred to a different membership:
- Go to all customers.
- Click “programs” under the participants subcategory.
- Click the participant’s name to access the program’s internal registration page.
- Click the pencil next to either the program or membership option.
- Select whether you are keeping the current payment plan (“keep current payment structure”) or adopting the payment plan of the new program (create new payment structure).
- If you choose to use the payment plan of the new program, you will be redirected to the POS to finish registration.
Here are pictures of what to look for:

Managing payments
How to apply a payment (or manual credit) towards a past due payment
To apply a payment or manual credit towards a past due membership payment:
- Go to all customers.
- Click “programs” under the participants subcategory.
- Click the participant’s name to access the program’s internal registration page.
- Go to the payments subsection on the left side menu in the program internal registration page.
- Click the past due payment.
- If you don’t want to re-run the payment method, choose “apply credit.”
- Enter the credit amount.
- Choose the credit method.
Note: A manual credit works the same as a coupon or gift credit you are giving to the participant. It does not affect your sales analytics or income amounts and effectively erases the past due payment.
Here are pictures for what you’re looking for:

How to apply a refund
To apply a refund to a membership payment:
- Go to all customers.
- Click “programs” under the participants subcategory.
- Click the participant’s name to access the program’s internal registration page.
- Go to the payments subsection on the left side menu in the program internal registration page.
- Click the payment history section.
- Click on the payment you would like to refund and click “apply refund.”
You can enter the full amount or enter a partial refund.
Note: Because manual credits act as coupons or store credits, you cannot refund or undo a manual credit.
Here are some pictures of what to look for:

How to add additional payments
To add additional payments to a membership:
- Go to all customers.
- Click “programs” under the participants subcategory.
- Click the participant’s name to access the program’s internal registration page.
- Go to the payments subsection on the left side menu in the program internal registration page.
- In the upcoming payments section, click “add payments.”
- Enter the payment amount.
- Choose whether this is a single additional payment or if it is recurring.
- If it’s a recurring payment, set the amount of payments and payment frequency.
- Choose the payment date.
Here are some pictures of what to look for:
