
Table of contents
Permissions and accessibility
Staff access:
- Admin
- Full access
- Manager
- Full access
- Staff
- No access
MyStudio plan restrictions:
- None
We’re here to help!
We recognize that the migration process can feel daunting — but you’re not alone! During your onboarding with MyStudio, we’ll provide guidance to walk you through the steps of the process.
If you’d like us to handle the migration for you from start to finish, our Migration Package is available for a smooth, hands-off experience.
Prefer to get a head start or manage things yourself? Check out the rest of this article for step-by-step instructions.
Setup
Before you can do any migrations, you will need to set up your program categories and membership options, so the system knows what to connect members to.
To set up your programs, check out our article here: Programs
These have to be created first in title alone. If you have members with payment amounts and frequencies that differ from your current rates and frequencies, you don’t need to change or create those differences for migration as this can be established separately while migrating.
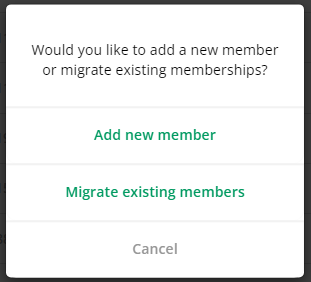
Individual migration
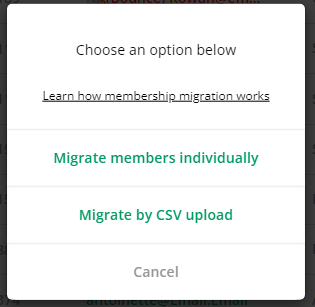
Individual migration is used to import one member at a time. Access this import option through all customers > program participants > add member. Then choose “migrate existing members” > “migrate members individually.”
You will then be presented with the migration form for individual members.
Buyer and participant details

Enter the buyer and participant info. Required fields include:
- Buyer First and Last Name
- Buyer Phone Number
- Buyer Email
- Participant First and Last Name
- Participant Date of Birth
The other detail fields are optional. These include:
- Buyer address
- Participant notes
- Any custom participant fields you created in all customers > settings
Membership and payment details
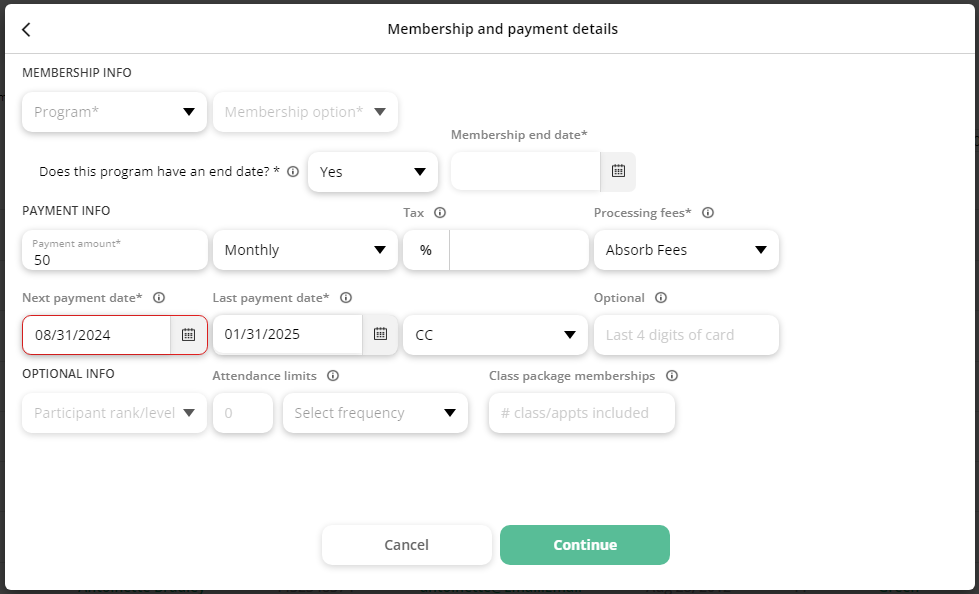
You will then need to enter the membership and payment details. These fields include:
- Program: choose one of the programs you created in services and products. This is required.
- Membership option: choose one of the membership options from that program. This is required
- Does this program have an end date: this is required
- No: selecting this option means the membership will be ongoing indefinitely until it is manually canceled
- Yes: selecting this option means the membership will have an end date and a last payment date before the membership goes into completed status
- Membership end date: this will only appear if you select “yes” in the previous field. This is required if it shows for you.
- Payment amount: enter the cost that will be charged to the customer per the frequency field. This is required, even if you enter $0. If you enter $0, the member will immediately go into active status when you complete the migration.
- Payment frequency:
- None: if you select this, the payment amount (if any) will be taken one time according to the next payment date. This will remove the last payment date field if you selected yes to the membership having an end date.
- Weekly
- Semi-monthly: payment will be taken on the 1st and 15th of every month
- Monthly
- Annually
- Custom: If you select this, you will also need to enter how often payment is taken
- Tax percentage
- Processing fees: this is required
- Absorb
- Pass on
- Next payment date: if you have entered an amount more than $0 for the payment amount, this field will determine the next payment date. This must be at least six days in the future.
- Last payment date: this will appear if you entered “yes” for the membership having an end date and entered a payment amount and frequency other than “none.” This field is required if it shows for you.
- Payment method: you do not have to enter the payment information, only select what type of payment the customer will be using.
- CC
- ACH
- Manual: this is a cash or check payment method. If you select this option, the member will immediately go into active status when you complete the migration.
- Last 4 digits of the credit card number: this is an optional field
- Participant rank/level: if you created ranks and levels for the membership selected, you can enter the member’s rank. This is an optional field.
- Attendance limits: this is an optional field. You can either enter this or the class package memberships info
- Class package memberships: this is an optional field that shows how many classes a member has left in total for their program. You can either enter this or the attendance limits.
- Custom registration fields: these fields will only appear if you add custom registration fields in services and products > programs. These fields are optional.
Once you complete the migration, members may be automatically placed in the active members list if there are no upcoming payments or if you selected a manual payment method. Otherwise, members will be placed in pending memberships. Check out further below for more information on this section.
You will also be asked if you would like to activate the migration email. This email prompts members to update their payment method on a registration and sends 6 days before the member's scheduled next payment date. If payment information is not provided more than 5 days before the scheduled next payment date, the system will automatically update the payment date to the next applicable date.

Bulk migration
If you have many existing members you need to enter into MyStudio, you can choose to do bulk migration through a CSV upload. Access this import option through all customers > program participants > add member. Then choose “migrate existing members” > “migrate by CSV upload.”
You will then need to do the following steps:
Step 1: Upload file

Upload a CSV file of your current members. It doesn’t need to follow the same column headers that our system uses; we will match columns in the next step.
Note: you can only enter one CSV file per migration.
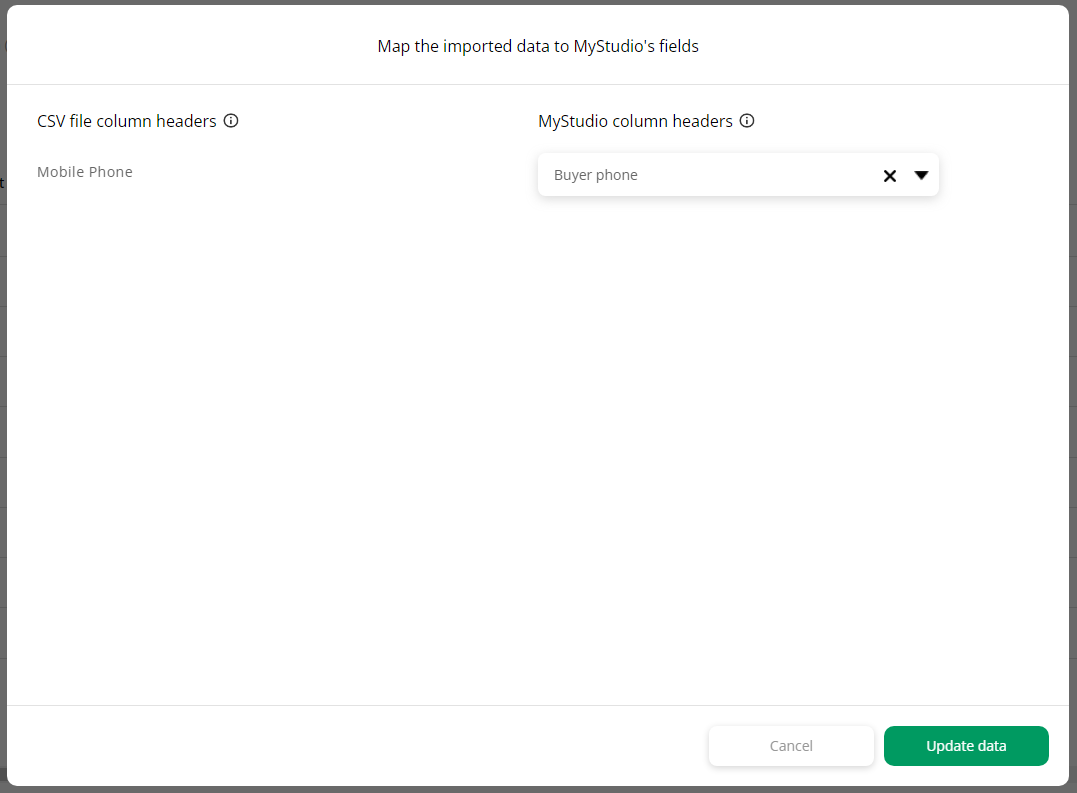
Step 2: Match columns
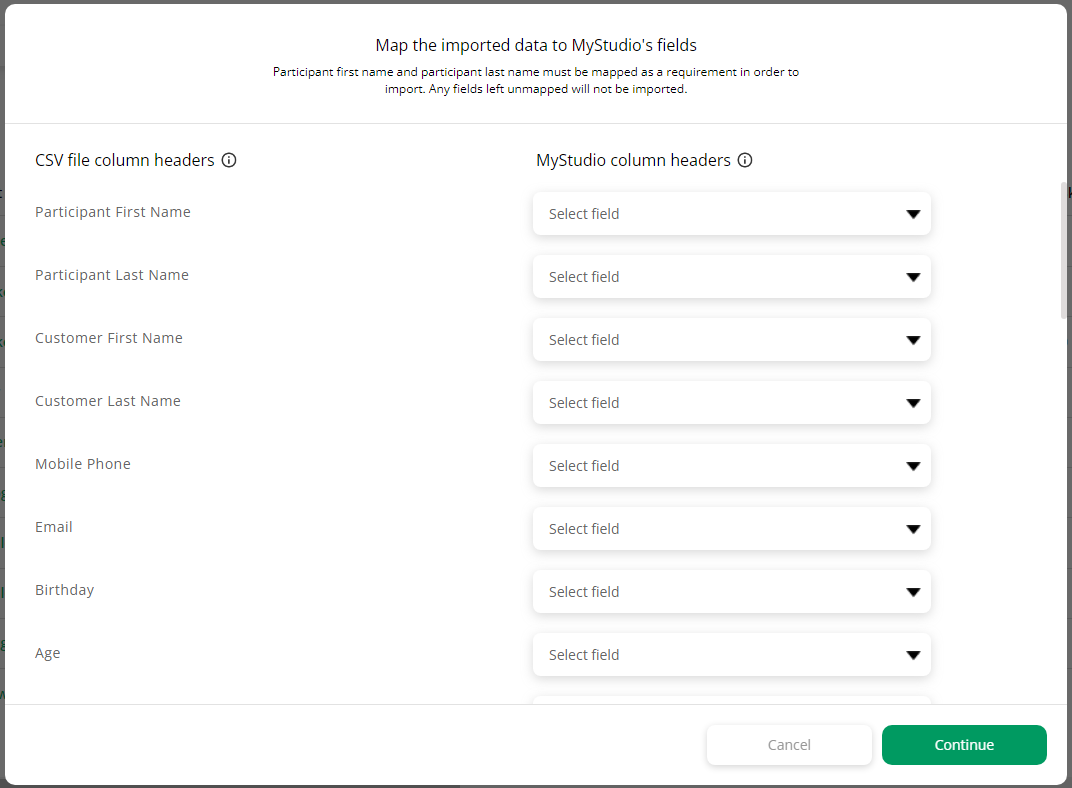
Next, match the column titles of the CSV file you uploaded to the MyStudio column headers we use in the system. This ensures that the data is entered into the correct table columns. For example, let’s say you had a “customer first name” column. This could map, or match, to the buyer first name column header that MyStudio uses.
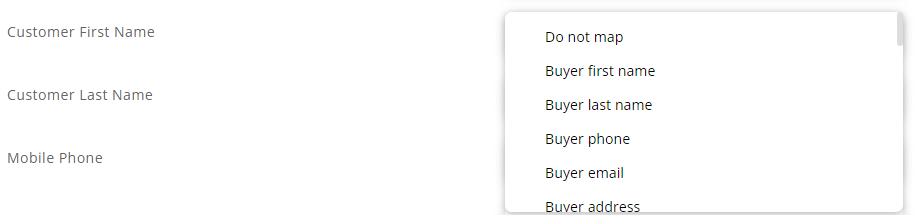
The only MyStudio columns headers that are required to be matched to your CSV columns are “participant first name” and “participant last name.” However, the more unmatched data you have upon migrating, the more errors you will need to correct.
Once you have finished matching column data, members will be put in the all customers > pending memberships section. You will be redirected automatically to the “needs clarification” subsection to fix any errors.
Pending memberships: needs clarification
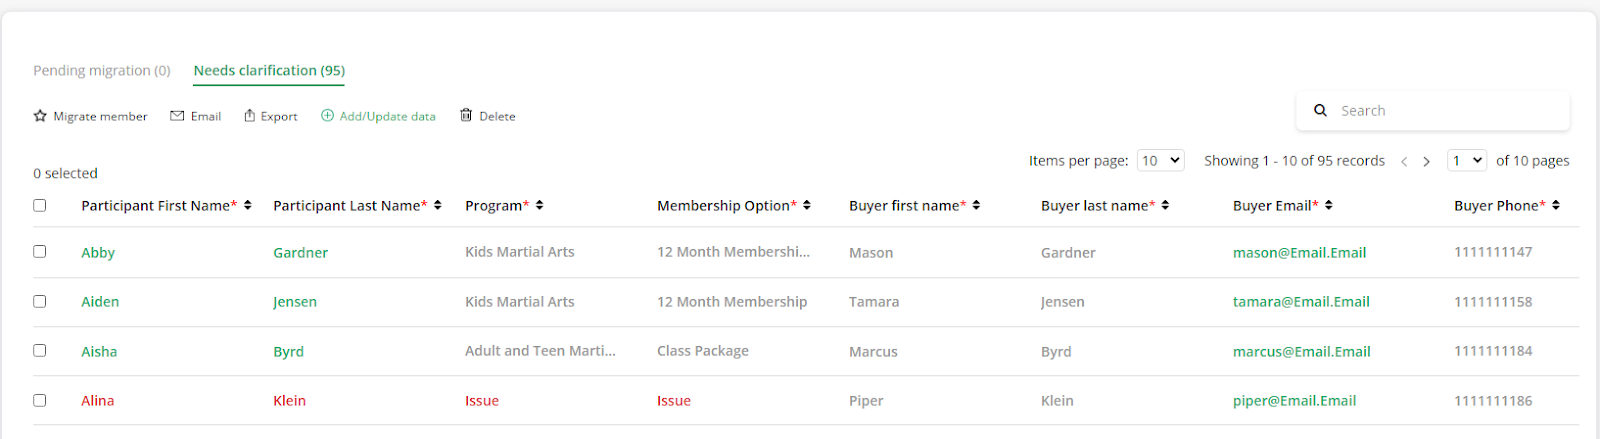
In the all customers > pending memberships > needs clarification section, you will see a list of migrated members who have errors with their records. You will need to fix these errors before they can go into pending migration and the members can update their payment information. The data point that needs fixing will be marked with the word “issue” in red. Click on the pending member’s name or the issue specifically to fill out the correct information.
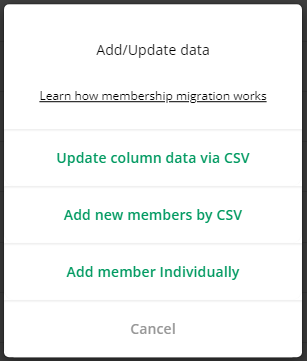
Bulk update records
If you had forgotten to match a column from your csv file to the MyStudio columns, you can bulk update records by clicking “add/update data” above the table. Then click “update column data via CSV.”
Step 1: re-upload file
Make any fixes to the CSV file you used prior, then reupload it.
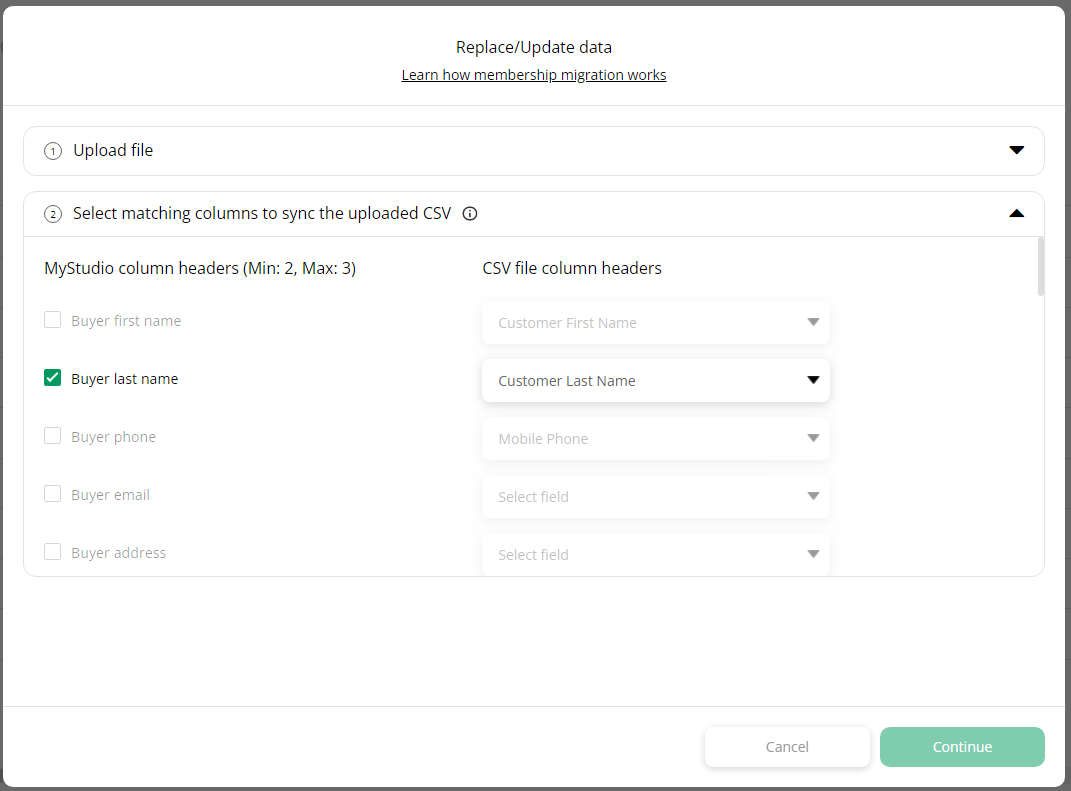
Step 2: differentiate the records
You will then need to tell the system how to differentiate the data already entered in the system by checking the box next to the column headers. This helps the system differentiate duplicate records or multiple registrations. You must select a minimum of 2 data points and a maximum of 3. For example, you can choose participant first name, buyer last name, and membership category to help differentiate multiple registrations under the same buyer.
Note: you will be choosing which data points you are fixing in the next step, so don’t choose these columns in this step.
Step 3: select what to update
In the next step, check the data points you are bulk updating.

Step 4: match the column headers
You will then map the column title to the MyStudio column header.
If you chose items in step 2 that don’t differentiate the records enough, you will see a popup with how many records were matched and how many are potential duplicates.

You can review the report by clicking “preview report.” You can even export this list to help you fix your CSV file if needed.

Table actions

Once some records have been fixed, the participant name will be green. You can then check the box next to these members and migrate them into the pending migration list by clicking “migrate member” above the table.
Note: If a record has a manual payment method or no future payments, these members will automatically be migrated into the active members list.
You will also be asked if you would like to activate the migration email. This email prompts members to update their payment method on a registration and sends 6 days before the member's scheduled next payment date. If payment information is not provided more than 5 days before the scheduled next payment date, the system will automatically update the payment date to the next applicable date.
From this section, you can also do the following actions:
- Export
- Delete
Pending memberships: pending migration
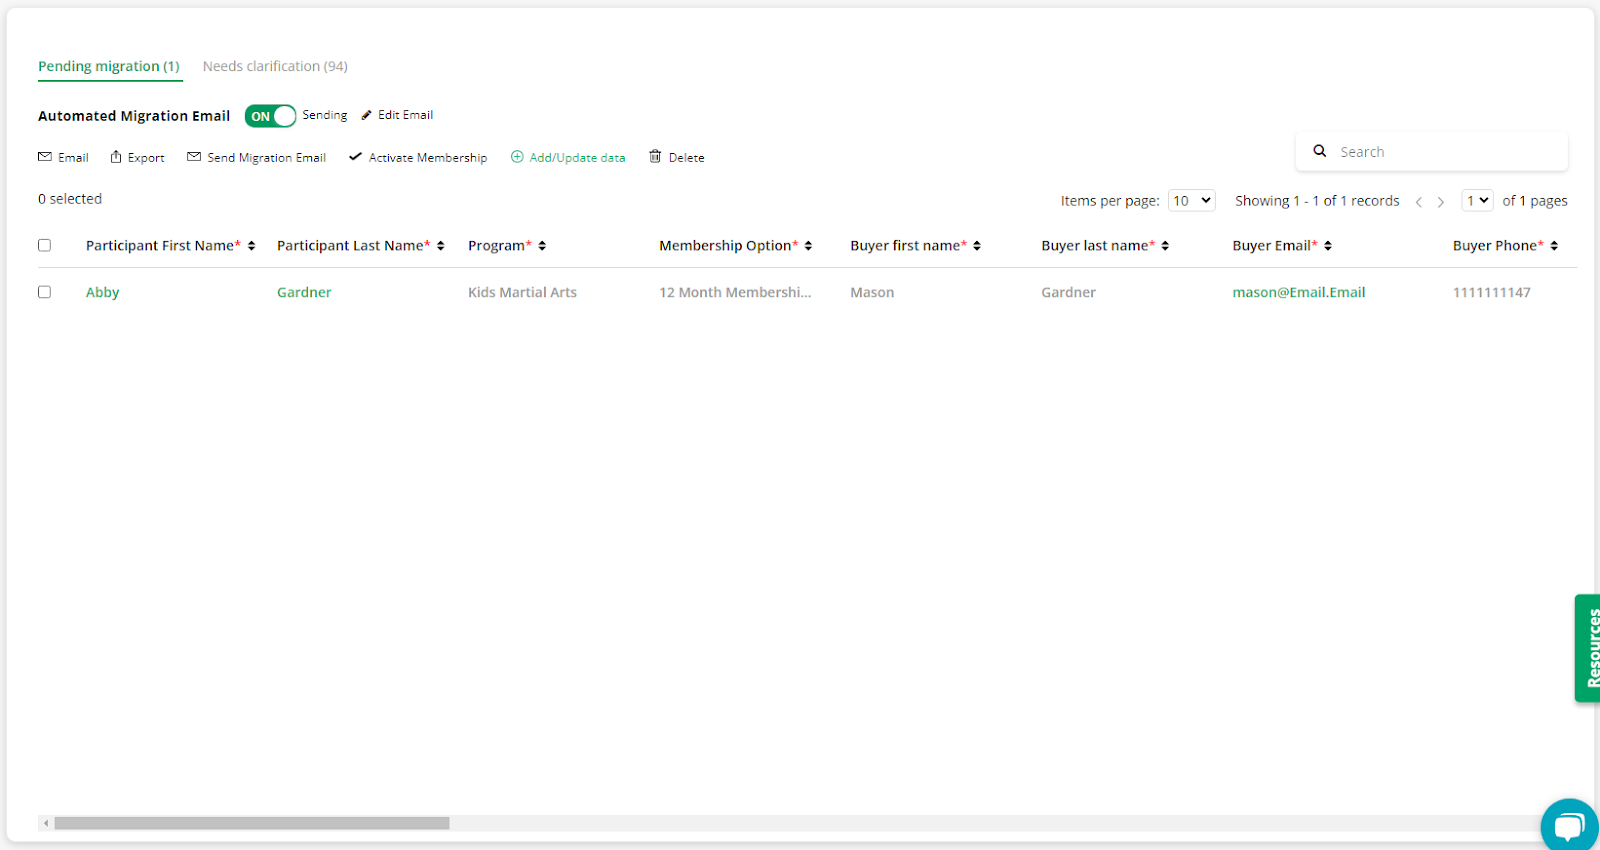
The pending migration section shows a list of members that haven’t updated their payment information yet. From this section you can do the following:
- Automated migration email toggle: if this is turned on, the migration email to update the payment information will be sent to members 6 days prior to the next payment date. If this is turned off, the migration email will not be sent.
- Edit email: edit the migration email
- Export
- Send migration email: this will manually send the migration email to selected members
- Activate membership: this will manually activate the membership. This means that no payment method will be attached to the membership and it will need to be updated later.
- Add/update date: bulk migrate or update members
- Delete
Import payment tokens from current processor to MyStudio
If your current processing company can also transfer the payment data to MyStudio, this will allow us to import the payment info and match it to each membership profile according to the last four digits of the credit card that was entered in step 3 during the individual or CSV migration forms.
PLEASE NOTE: All steps in this article before this section will still need to be completed first. We also highly recommend having the automated system send out emails so that members can begin to update their payment information right away!
When we receive payment data from the processing company -- which can take weeks and is solely dependent on how fast your current processing company wants to help you -- we can then map the information to any membership profile that is still pending.
Processors that MyStudio can transfer payment information from are below:
Authorize.net
PayPal
Stripe
Spreedly
Blackbaud
WorldPay
iATS
Adyen
Network Merchants, Inc (NMI)
Zuora
USA ePay
Please reach out to your current software provider letting them know you are wanting to migrate to a new system and would like to request a data transfer.
Once this is complete, you will need to reach out to your Customer Success Manager (CSM) to assist with the next process of notifying Stripe of this request for payment token transfer from your current processor.
Once we receive the payment information, we will map the payment data to all membership profiles who are still in the "Pending Migration" tab!
Need help or have more questions? Please reach out to our support team directly via our chats at the bottom right corner of your control panel, or by calling us at (757)997-1233.