
Table of contents
- Permissions and accessibility
- Table
- Profile
- FAQ
- How to delete primary customer account
- How to delete participant
- How to edit a participant's name and birthday
- How to add participant photo
- Information belongs to a different primary account: merging
Permissions and Accessibility
Staff Access:
- Admin
- Full access
- Manager
- No access to deleting communication or primary accounts
- Staff
- No access
MyStudio Plan Restrictions:
- SMS requires communication enhancement add-on
- Communication history is dependent on your plan
- Starter: 14 days
- Growth: 30 days
- Scale: 24 months
- Communication edits / deletion is dependent on your plan
- Starter: cannot see scheduled communication
- Growth: cannot see scheduled communication
Table
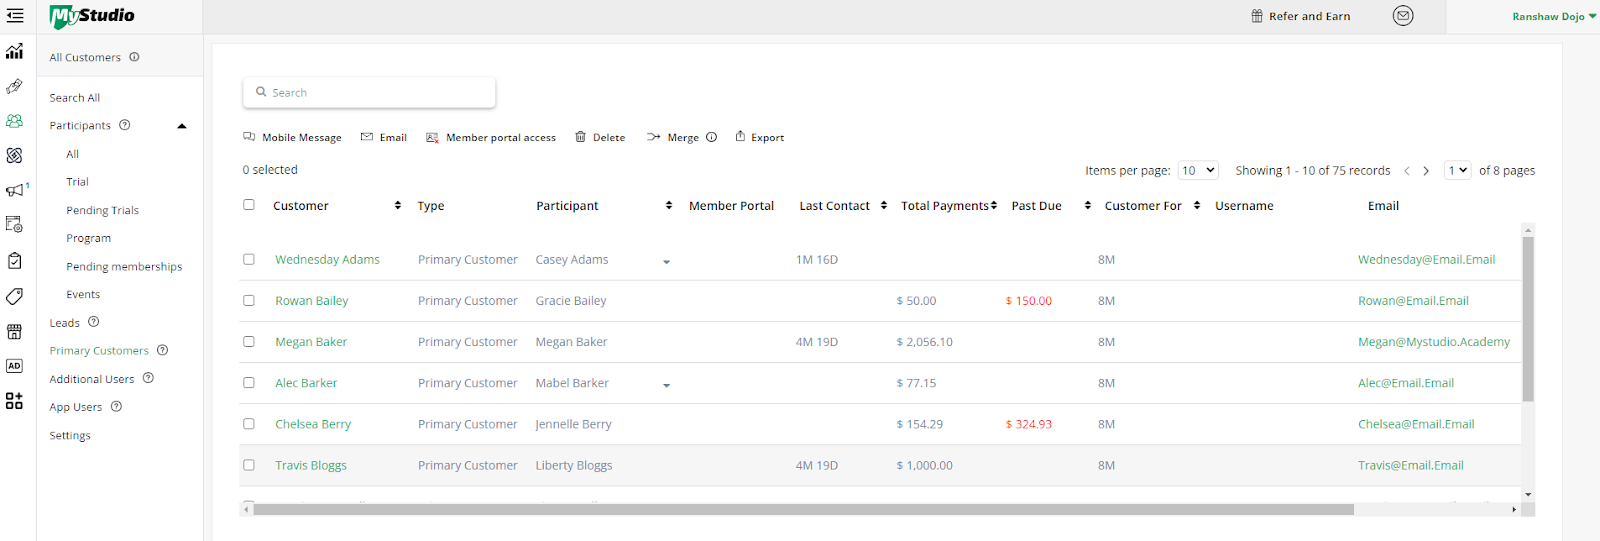
A primary customer is the buyer paying for your services. Sometimes the buyer is also a participant. Access the primary customers list in all customers > primary customers. This table will show you the following information:
- Customer name
- The type of the account (primary customer)
- Participants: if the primary customer has more than one participant, there will be a drop down to view all
- Member portal: if the primary customer has a member portal icon, it means they have accessed the member app
- Last contact: the amount of time that has passed since contact was last made
- Total payments: the total amount of payments associated with the registrations under the primary customer
- Past due: the total past due amount associated with the registrations under the primary customer
- Customer for: the length of time the primary customer has been a customer
- Username: if the customer has accessed the member app, this is the username associated with the login
- Email: primary customer’s email. Clicking this will open the email creation.
- Mobile phone number: if the number is unsubscribed or bounced, you can click on this to send an invite via email to resubscribe or unblock the number.
Above the table, you can do the following actions:
- Mobile message: send an SMS or in-app message
- Email: send an email. You can also click the email within the table to send an email
- Member portal access: disable or enable a customer’s access to the member app
- Delete: the only customer types that can be deleted from all customers are app users, leads, and additional users. Primary customers MUST be deleted from the primary customer profile after all registrations have been canceled.
- Merge: combine duplicate customers into one profile. See our merging article here for more information: Merging
- Export
Profile
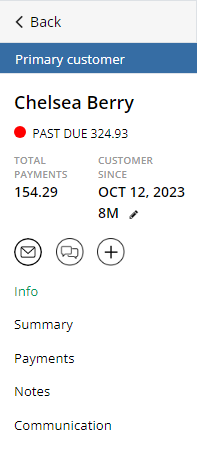
When you click on a primary customer’s name from the data table, you will be brought to the primary customer profile. On the left here, you can see:
- Past due payments
- Total payments
- Customer since: how long the customer has been a customer. You can edit this date at any time.
- App access icon: enable or disable app access
- Email icon
- Mobile message icon
- Plus button: register an existing or new participant under the customer for additional offerings by clicking the plus button and following the choice prompts.
- Info: info connected to the primary customer, including payment methods, customer information, participants, and additional users.
- Summary: a summary of all participants’ registrations.
- Payments: payments associated with all participants under the primary customer.
- Notes: view or add notes associated with any of the participants under the primary customer.
- Communication: all sent and scheduled communication to the primary customer.
Info
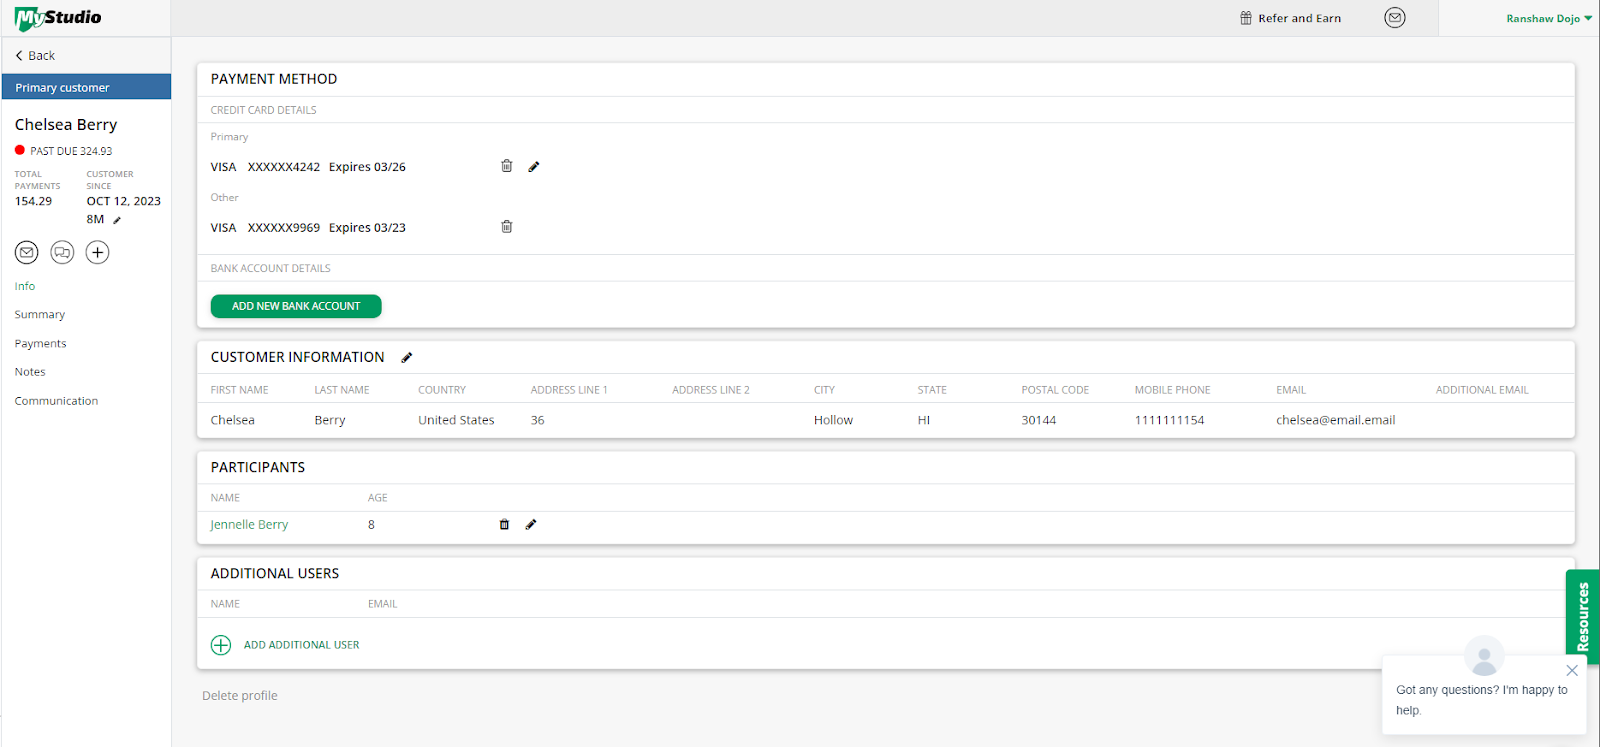
In the info section, you will see various details connected to the primary customer. This includes:
- Payment method: view which credit cards and bank accounts are on file for the customer.
- Delete any cards by clicking the trash can.
- Click the pencil next to the primary credit card to update the card on file.
- If the customer needs to add a new bank account, click “add new bank account.” This will send a link to the customer so that they can update or enter the banking information.
Note: For security reasons, you will not be able to enter full ACH banking information into an account. This can only be done by the customer through this type of link or from within the member app.
- Customer information: view and edit any of the primary customer’s contact information. If you are updating the information and are told that the email or phone number is associated with a different customer, you will be prompted to merge if you wish. For more detailed information on how to merge, check out our article: Merging.
- Participants: this is a full list of the participants connected to the primary account
- Edit the participant’s name or birthday by clicking the pencil next to their name
- “Delete” the participant by clicking on the trash can. This does NOT actually delete the data associated with the participant unless they were only attached as a lead. If the participant had registrations, you will be prompted to merge that information into a different participant either under the same buyer or a different buyer.
- Additional users: lists additional users attached to the primary customer. Additional users act as their own accounts, but are directly connected to the participants and registrations of the participants under the primary customer. This means that they can register the participants for things, access resources, and see class schedules for the participants.
- Add additional users by clicking “add additional user” and entering the first name, last name, and email.
Lastly, this section is where you can select to delete a primary customer profile by clicking “delete profile” at the bottom of the page. All registrations for all participants under the primary customer must be canceled first and you will be asked to provide your login info before proceeding.
IMPORTANT: deleting a primary customer profile cannot be undone! Proceed with caution!
Summary
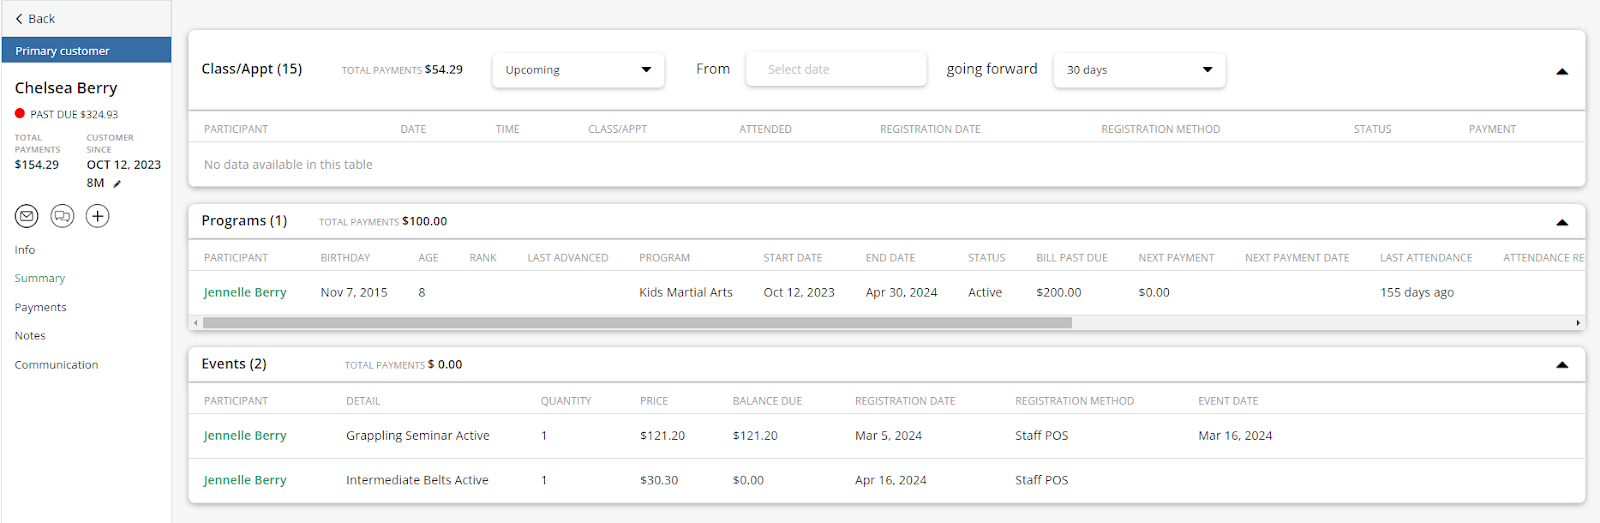
In the summary section of the primary customer profile, you will see a list of all the participants’ current, past, future, and on hold registrations. The drop down titles will display how many registrations of that type the participant has been registered for and the total payments associated with each category. Click the drop down arrow to see a more comprehensive list of a registration type.
Class/Appt

The class/appt list will show you:
- Registered participant name: clicking on the name will redirect you to the program registration attached to the class
- Date the class will or did occur
- Time the class will or did occur
- Class/appt name
- Whether the participant has attended or not attended the class
- Registration date: if the class is recurring it will say “recurring” next to this date
- Registration method
- Status
- Cost
The default list shown is for upcoming classes, but you can click on the drop down to view completed, canceled, or waitlisted classes as well. You can also enter the starting date of the list and how far forward or back you would like to see (up to 90 days).
From the upcoming list, you can cancel or reschedule the class. If it is a recurring class, you will also be asked if you are canceling/rescheduling only the one class, or this and all ongoing classes.
In the completed list, you can delete any listed completed classes.
In the canceled list, you can hover over the canceled status to see who canceled the class.
In the waitlisted list, you can remove the participant from the waitlist.
Programs

The programs list will show you:
- Participant name: clicking on the name will redirect you to the program registration page
- Participant’s birthday
- Participant’s age
- Rank per program registration
- Last advanced
- Program name
- Start date
- End date: this will also include the cancellation date
- Status:
- Active: participant is currently enrolled and attending the program
- Deleted: the registration for the program was deleted
- On hold: attendance of this program is currently on hold
- Canceled/completed: the program was canceled or completed
- Transferred: the participant was transferred from this program to a different one
- Past due amount
- Next payment amount
- Next payment date
- Last attendance
- Attendance requirement: for rank advancement
- Attendance in the last 14 days
- Attendance in the last 30 days
- Total payment
- Registration date
- Registration method
Trials

The trials list will show you:
- Participant name: clicking on the name will redirect you to the trial registration page
- Participant’s birthday
- Participant’s age
- Trial name
- Trial cost
- Status:
- Active: participant is currently enrolled and attending the program
- Deleted: the registration for the trial was deleted
- On hold: attendance of the trial is currently on hold
- Cancelled: trial registration was cancelled
- Start date
- End date
- Last attendance
- Total attendance
- Attendance last 14 days
- Attendance last 30 days
- Source
- Registration date
- Registration method
Events

The events list will show you:
- Participant name: clicking on the name will redirect you to the event registration page
- Event name
- Registration quantity
- Event cost
- Balance due: this is the amount the buyer still has to pay towards the event
- Registration date
- Registration method
- Event start date
Each event date/option will be listed individually.
Retail

The retail list will show you:
- Buyer name: clicking on the name will redirect you to the retail order page
- Detail: what was purchased
- Price
- Status
- Order date
If multiple items were ordered, they will be listed separately here.
Miscellaneous (custom charge)

The custom charge list will show you:
- Buyer name: clicking on the name will redirect you to the miscellaneous order page
- Price
- Date: date of the transaction
- Detail: any notes that were entered during the transaction
Lead

The lead list will show you:
- Opt in date: when the participant entered the lead list. Clicking on this date will redirect you to the lead internal page.
- Participant first name
- Participant last name
- Program interest
- Status
- Source
Payments

In the payments section of the primary customer profile, you will see all payments associated with the participants’ registrations. This includes past due payments, upcoming payments, and payment history. All three sections will show you:
- Due date: clicking on this will redirect you to the payments section of the registration page
- Payment amount: in the payment history section it will show refunds as a negative value
- Payment method
- Category: what kind of transaction it was for (programs, events, etc)
- Detail: the name or item of the transaction (program name, event name, retail item, etc)
- Other detail: the secondary name or item detail of the transaction (membership option, event date/option, retail item variant, etc)
Notes

The notes section will display most actions taken towards the participants such as registrations, status changes, transfers, and rank updates. You can view all notes or select a specific participant or a specific category of notes from the drop downs, and you can add custom notes by clicking “add note.”
Scheduled holds and cancellations can be edited or deleted from this section by clicking the pencil or trash can icon next to the note.
Note: If a participant is already on hold, you will not be able to edit or delete this note as it requires you to manually re-activate the member from the program or trial registration page.
Communication
Sent conversations
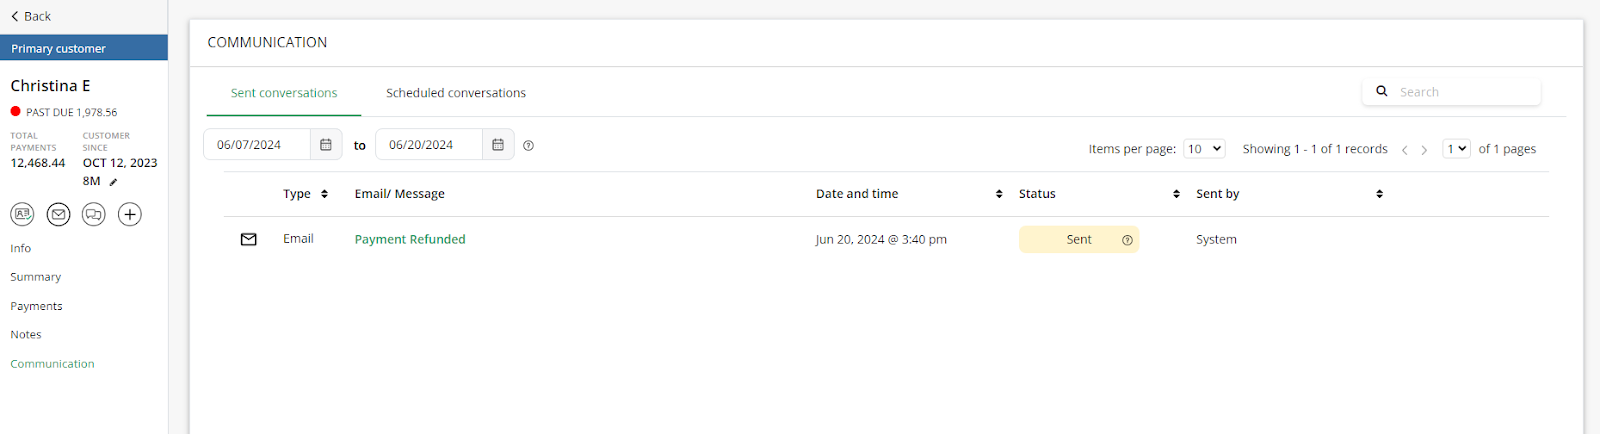
In the communication section in the primary customer profile, you will see a list of past conversations with the primary customer. All forms of communication will appear here, including system emails for registrations, migration, etc. You can specify a certain time frame within your MyStudio plan limitations from the calendar ranges above the table.
The table will show you:
- Type: email, SMS, or in-app message
- Email / Message: a brief beginning of the message
- Date and time: the date and time the communication was sent
- Status:
- Email
- Opened
- Clicked
- Bounced
- SMS
- Delivered
- Undelivered
- Failed
- Bounced
- Read
- In app
- Sent
- Read
- Email
- Sent by: who sent the communications
- Staff member
- Amplify
- Automation
- System
You can click on any of these communications to be redirected to the full conversation.
Scheduled conversations
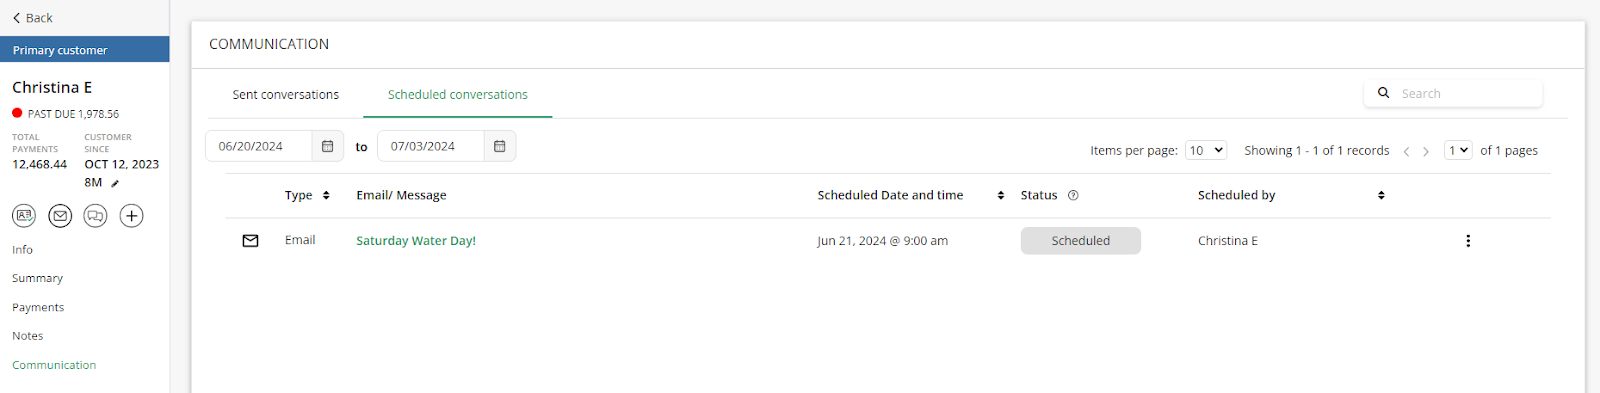
If you are on our scale plan, you will also have a tab to view scheduled communications from right within the primary customer profile. You can specify a certain future time frame from the calendar ranges above the table up to 24 months in the future.
The table will show you:
- Type: email, SMS, or in-app message
- Email / Message: a brief beginning of the message
- Scheduled date: the date and time the communication was scheduled to send
- Status: scheduled
- Scheduled by: who scheduled the communications
- Staff member
- Automation
You can also select to edit or delete the scheduled message directly from this section.
FAQ
1. How do I delete the primary customer profile?
You can delete the primary customer profile only from the primary customer profile in the info section at the bottom of the page. Please note that all registrations must be cancelled prior to deletion, you will have to enter your login info to confirm, and this action cannot be undone, so please proceed with caution!
2. How do I delete a participant?
“Delete” the participant by clicking on the trash can next to their name in the primary customer profile > info > participants list. This does NOT actually delete the data associated with the participant unless they were only attached as a lead. If the participant had registrations, you will be prompted to merge that information into a different participant either under the same buyer or a different buyer.
3. How do I edit a participant's birthday?
Edit the participant’s name or birthday by clicking the pencil next to their name in the primary customer profile > info > participants list.
4. How do I add a participant photo?
Participant photos can only be added from the participant profile. From the primary customer profile, you can click on the participant's name in the participant list to be redirected to the participant profile. Then click on the picture icon above their name to add a photo.
5. I was trying to edit the primary customer contact info and it's saying someone else has the information. What do I do?
If you are updating the information and are told that the email or phone number is associated with a different customer, this means you have a duplicate primary customer account or additional user account with that info. You will be prompted to merge the profiles if you wish. For more detailed information on how to merge, check out our article: Merging.