
Table of contents
Permissions and accessibility
Staff access:
- Admin: Full access
- Manager: No access
- Staff: No access
MyStudio plan restrictions:
- How many automations you are able to create is based on your MyStudio plan
- Starter: 0
- Growth: 10
- Scale: 20
- Only scale plans can remove members from automations.
- We have an automations add-on which gives you unlimited automation creation.
Status
The status type program automation is ideal for welcoming new participants, marketing to cancelled / completed registrants, etc. To create this automation, go to automations > program > create new campaign.
Tip: Save time with automation creation by choosing one of our system templates!
1. Automation type

Name the title of your automation, then, in step 1, choose “status.”
2. Who can enter this automation
Select which type of participants can enter the automation:
- All participants: includes participants in all trials, programs, and drop-ins, including from programs and trials that have been unpublished.
- All live programs and trials: includes participants from any live program and trial. Any future live program and trial will also be included. Unpublished programs and trials will not be included, regardless of if there are still active members.
- Specific programs and trials: select which programs and trials are included.
Select date: this specifies that only participants who have a membership start date on or after the one selected will be able to enter the automation.
3. Automation start time

Enter the time the communication should activate actions.
4. Entry conditions and actions
In the workflow, select “entry conditions” and select which statuses to include in the automation workflow. Then click “exit conditions” to choose which statuses will remove participants from the automation. Members will be automatically removed from the campaign after all workflows have been triggered.
After entering the time frame fields, add a new action for this workflow:
- Email:
- Choose an email template or create a new template. Then choose whether this first workflow will send immediately, at the specified time, or x number of days after the automation start time.
- You can view or edit the template by clicking “view / edit.”
- Mobile message:
- Choose a mobile message template or create a new template. You can view or edit the template by clicking “view / edit.”
- Choose whether it sends and SMS or in-app message
- Then choose whether this first workflow will send immediately, at the specified time, or x number of days after the automation start time.
- Task:
- Choose a task template or create a new template. You can view or edit the template by clicking “view / edit.”
- Assign the task to a specific staff member
- Then choose whether this first workflow will send immediately, at the specified time, or x number of days after the automation start time.
Note: If you select to activate the task at the specified time, but the requirements are met after the send time, the automation will trigger the following day.
You can create additional tasks to trigger at the same time for the same workflow by clicking “new action” in the same workflow card.
If you want to create an automation flow, you can add additional workflows for additional time frames by clicking “new workflow.” You can edit or remove actions by clicking on them, or you can remove workflows by clicking the trash icon.
Be sure to save your automation before clicking away! Our system will not prompt you to save and you will lose set up progress if you click away before saving.
Level / rank
The level / rank type program automation is ideal for informing participants of rank update opportunities, sending info on certain ranks, etc. To create this automation, go to automations > program > create new campaign.
Hint: Save time with automation creation by choosing one of our system templates!
1. Automation type
Name the title of your automation, then, in step 1, choose “level / rank.”
2. Who can enter this automation
Select which type of participants can enter the automation:
- All participants: includes participants in all trials, programs, and drop-ins, including from programs and trials that have been unpublished.
- All live programs and trials: includes participants from any live program and trial. Any future live program and trial will also be included. Unpublished programs and trials will not be included, regardless of if there are still active members.
- Specific programs and trials: select which programs and trials are included.
Select date: this specifies that only participants who have a membership start date on or after the one selected will be able to enter the automation.
3. Automation start time
Enter the time the communication should activate actions.
4. Entry conditions and actions
In the workflow, select “entry conditions” and select which program’s levels / ranks to include in the automation workflow. You can even select specific ranks instead of all in the program. Click next and select whether the participant needs to have met attendance and/or skill rank requirements in order to be included.
If you click “exit conditions,” you will see that members will be automatically removed from the campaign after all workflows have been triggered or if the level/rank no longer meets the selected requirements.
After entering the time frame fields, add a new action for this workflow:
- Email:
- Choose an email template or create a new template. Then choose whether this first workflow will send immediately, at the specified time, or x number of days after the automation start time.
- You can view or edit the template by clicking “view / edit.”
- Mobile message:
- Choose a mobile message template or create a new template. You can view or edit the template by clicking “view / edit.”
- Choose whether it sends and SMS or in-app message
- Then choose whether this first workflow will send immediately, at the specified time, or x number of days after the automation start time.
- Task:
- Choose a task template or create a new template. You can view or edit the template by clicking “view / edit.”
- Assign the task to a specific staff member
- Then choose whether this first workflow will send immediately, at the specified time, or x number of days after the automation start time.
Note: If you select to activate the task at the specified time, but the requirements are met after the send time, the automation will trigger the following day.
You can create additional tasks to trigger at the same time for the same workflow by clicking “new action” in the same workflow card.
If you want to create an automation flow, you can add additional workflows by clicking “new workflow.” You can edit or remove actions by clicking on them, or you can remove workflows by clicking the trash icon.
Be sure to save your automation before clicking away! Our system will not prompt you to save and you will lose set up progress if you click away before saving.
Membership start date
The membership start date type program automation is ideal for welcoming new participants, sending reminders of the start date, checking in on how things are going, etc. To create this automation, go to automations > program > create new campaign.
Note: Save time with automation creation by choosing one of our system templates!
1. Automation type

Name the title of your automation, then, in step 1, choose “membership start date.”
2. Who can enter this automation
Select which type of participants can enter the automation:
- All participants: includes participants in all trials, programs, and drop-ins, including from programs and trials that have been unpublished.
- All live programs and trials: includes participants from any live program and trial. Any future live program and trial will also be included. Unpublished programs and trials will not be included, regardless of if there are still active members.
- Specific programs and trials: select which programs and trials are included.
Select date: this specifies that only participants who have a membership start date on or after the one selected will be able to enter the automation.
3. Automation start time
Enter the time the communication should activate actions.
4. Entry conditions and actions

In the workflow, click “status” and select which status to include in the automation workflow.
Then click “after” and choose whether you want to activate the workflow “on” or “after” the membership start date. If you choose “after,” you will also need to enter the amount of days after.
Click “exit conditions” and select which statuses that were not selected as entry conditions will remove the participant from the campaign. Otherwise, members will be automatically removed from the campaign after all workflows have been triggered.
After entering the time frame fields, add a new action for this workflow:
- Email:
- Choose an email template or create a new template. Then choose whether this first workflow will send at the specified time or x number of days after the automation start time.
- You can view or edit the template by clicking “view / edit.”
- Mobile message:
- Choose a mobile message template or create a new template. You can view or edit the template by clicking “view / edit.”
- Choose whether it sends and SMS or in-app message
- Then choose whether this first workflow will send at the specified time or x number of days after the automation start time.
- Task:
- Choose a task template or create a new template. You can view or edit the template by clicking “view / edit.”
- Assign the task to a specific staff member
- Then choose whether this first workflow will send at the specified time x number of days after the automation start time.
Note: If you select to activate the task at the specified time, but the requirements are met after the send time, the automation will trigger the following day.
You can create additional tasks to trigger at the same time for the same workflow by clicking “new action” in the same workflow card.
If you want to create an automation flow, you can add additional workflows for additional time frames by clicking “new workflow.” You can edit or remove actions by clicking on them, or you can remove workflows by clicking the trash icon.
Be sure to save your automation before clicking away! Our system will not prompt you to save and you will lose set up progress if you click away before saving.
Membership end date
The membership end date type program automation is ideal for reminding participants their end date is coming up, marketing program renewals, etc. To create this automation, go to automations > program > create new campaign.
Note: Save time with automation creation by choosing one of our system templates!
1. Automation type

Name the title of your automation, then, in step 1, choose “membership end date.”
2. Who can enter this automation
Select which type of participants can enter the automation:
- All participants: includes participants in all trials, programs, and drop-ins, including from programs and trials that have been unpublished.
- All live programs and trials: includes participants from any live program and trial. Any future live program and trial will also be included. Unpublished programs and trials will not be included, regardless of if there are still active members.
- Specific programs and trials: select which programs and trials are included.
Select date: this specifies that only participants who have a membership start date on or after the one selected will be able to enter the automation.
3. Automation start time
Enter the time the communication should activate actions.
4. Entry conditions and actions

In the workflow, click “status” and select which status to include in the automation workflow.
Then click “after” and choose whether you want to activate the workflow “before,” “on,” or “after” the membership end date. If you choose “before” or “after,” you will also need to enter the amount of days.
Click “exit conditions” and select which statuses that were not selected as entry conditions will remove the participant from the campaign. Otherwise, members will be automatically removed from the campaign after all workflows have been triggered.
After entering the time frame fields, add a new action for this workflow:
- Email:
- Choose an email template or create a new template. Then choose whether this first workflow will send at the specified time or x number of days after the automation start time.
- You can view or edit the template by clicking “view / edit.”
- Mobile message:
- Choose a mobile message template or create a new template. You can view or edit the template by clicking “view / edit.”
- Choose whether it sends and SMS or in-app message
- Then choose whether this first workflow will send at the specified time or x number of days after the automation start time.
- Task:
- Choose a task template or create a new template. You can view or edit the template by clicking “view / edit.”
- Assign the task to a specific staff member
- Then choose whether this first workflow will send at the specified time x number of days after the automation start time.
Note: If you select to activate the task at the specified time, but the requirements are met after the send time, the automation will trigger the following day.
You can create additional tasks to trigger at the same time for the same workflow by clicking “new action” in the same workflow card.
If you want to create an automation flow, you can add additional workflows for additional time frames by clicking “new workflow.” You can edit or remove actions by clicking on them, or you can remove workflows by clicking the trash icon.
Be sure to save your automation before clicking away! Our system will not prompt you to save and you will lose set up progress if you click away before saving.
Table and stats

In automations > programs, you will see your list of program automations. From this page you can do the following actions:
- Toggle the automation between active and inactive.
- Click on the title of the automation to make edits
- Click the email icon to see the statistics of sent, opened, clicked, bounced, and unsubscribed emails
- Click the mobile message icon to see the statistics of sent mobile messages
- Click the task icon to see the statistics of how many tasks were created
- Click the sent number to see a full recipients list
- Click the action drop down to do one of the following:
- Edit
- Duplicate
- Delete
When you click into the recipients list, you will see a table with the following information:
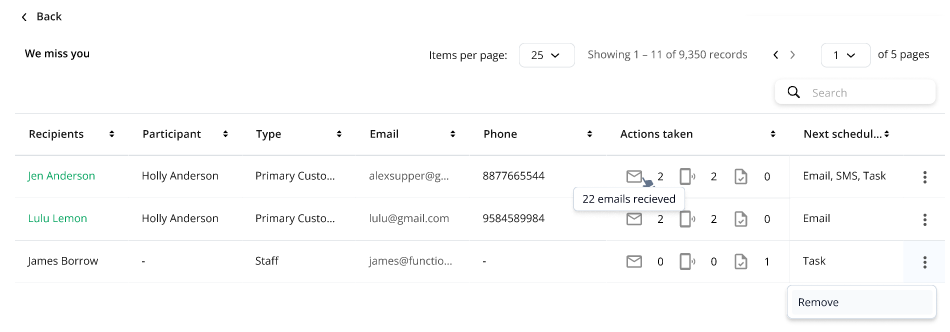
- Recipient (primary customer) name
- Participant name
- Type of person (primary customer or staff)
- Phone number
- Actions taken
- Next scheduled action
If you're on our scale plan, you can click the three dots to remove a recipient from the automation workflows.
IMPORTANT: If you remove someone from the automation, they will NOT be able to re-enter the automation.
Common scenarios
Membership welcome
If you want to create a welcome campaign for new program registrations, we recommend utilizing our “membership registration welcome” template! This automation type uses the following setup:
- Type: membership start date
- Actions: active status on membership start date; exit conditions: on hold and cancelled. Sends and sms to customer and creates task for staff to welcome the customer
This type of automation is great for building rapport with customers in order to maintain recurring members.
Membership expiration
If you want to create an automation for members whose programs are about to expire, we recommend utilizing our “membership expiration” template! This automation type uses the following setup:
- Type: membership end date
- Actions:
- Workflow 1: active status 90 days before membership expiration
- Workflow 2: active status 60 days before membership expiration
- Workflow 3: active status 30 days before membership expiration
- Workflow 4: cancelled status on membership end date
This type of automation is great for reminding customers of their membership end dates, informing them when their membership has ended, and offering renewal opportunities.
Rank advancement
If you want to create an automation to inform members about their rank advancement, we recommend utilizing our “rank advancement” template! This automation type uses the following setup:
- Type: level / rank
- Action: selected programs and ranks; turn on fulfilled attendance requirements and completed skill requirements
This type of automation is great for letting members know when they can test for rank advancement.
Class package program renewals
If you want to create an automation to inform members in class package programs that they’re almost out of classes, we recommend using our attendance automations instead. Check out our article here for information on how to set that up: Attendance Automations.