
Updated: February 20, 2026
Important: The V1 Attendance portal check-in is retiring on March 31, 2026. Please begin using the V2 portal to ensure a smooth transition. Refer to the V2 article for more details.
The Operations > Attendance section allows you to see data on how many participants have not been attending classes and contains access to the attendance portal and its settings.
Why Does it Matter?
Attendance is important to log how many participants are consistently attending classes. This knowledge can be applied to rank updates and can indicate to you which classes are keeping students engaged.
Permissions and Accessibility
Staff Access
- Admin
- Full Access
- Managers
- Access to the attendance portal and Admin Mode
- Does not have access to the attendance portal settings
- Staff
- Access to attendance portal
- Access to dashboard for memberships
- Does not have access to attendance portal settings
- Does not have access to dashboard trial information
MyStudio Plan Restrictions
- None
Details
Attendance Dashboard
At the top of the attendance dashboard, you can launch the attendance portal through clicking the link or copying and pasting the URL.
You can send you and your staff a scheduled report of zero attendances by using the filters in all customers > program participants. Check out this video for more info:
Settings
The Operations > Attendance > Settings section has many options for the attendance portal.
- Only show active participants: If this is turned on (green), then only participants with an active membership or trial will be displayed in the attendance portal. If this is turned off (yellow), then all participants will appear in the attendance portal, regardless of active registration.
- Allow participants to register during attendance check-in: If this is turned on (green), then participants can register for a class at the same time as check-in from the attendance portal as long as the class settings allow it from Services and Products > Classes and Appointments > Settings. If this is turned off (yellow), then participants have to register for the class prior to check in.
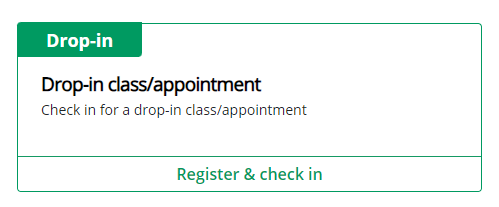
- Include drop-in as a class/appointment option: If this is turned on (green), there will be a time-stamped “drop-in class/appointment” option in the attendance portal that students can select instead of a class. This option does not connect to a membership or trial registration, so it does not count towards attendance limits or requirements. If this is turned off (yellow), this option will not show in the class list in the attendance portal.
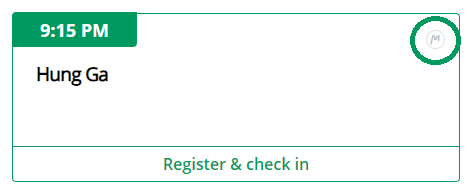
- Enable quick check-in: If this is turned on (green), the system will check attendance logs in the background so that check-in is faster. If there is a problem with check-in (past due payment, attendance limits reached, etc), the studio will receive an email. You can also check the (M) icon on the class card to see what the issue was. If this is turned off (yellow), check-in validation occurs for each participant. If there is an issue with a check-in, a popup will appear. If you had selected to start the attendance portal by showing classes, the portal will refresh to the class list after every check-in.
- Start check in with users selecting a class time or a participant name:
- Show classes will show a list of classes for the attendance portal before choosing a participant.
- Show participant name will show a list of participants before choosing a class.
- How should participant names be displayed:
- Show all participant names will show all names regardless of class registration
- Show only registered participant names will show only the names of participants who registered for class prior to check-in
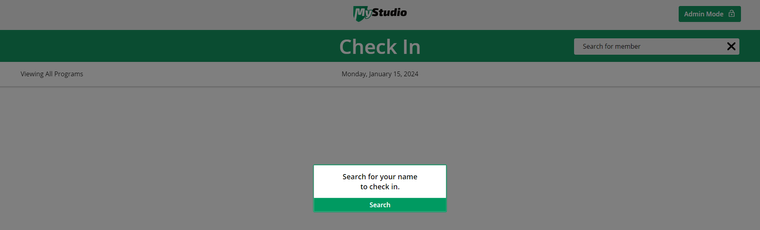
- Show no participant names (search only) will only display a search bar. This will search all participants
- How should class times be displayed:
- Show all class times will show all class times available for the day
- Show classes within a specific time will activate the next setting where you can enter how many minutes before and after the current time you want classes to appear. For example: if it is currently 4pm and you entered 60 minutes, the attendance portal will only show classes that start between 3pm - 5pm.
- Show only drop-in as a class appointment will allow a quick check in only for the drop-in option. It is directly connected with the “include drop-in as a class/appointment option” setting. If “show only drop-in” is selected, “include drop-in as a class/appt option” will automatically be turned on if it is not already.
- Show classes this many minutes before and after the current time: enter the amount of minutes as discussed in the “show classes within a specific time” setting above.
- What information would you like to display for each participant?
- Name is always required
- Birthday will show the month and day of a participant’s birthday
- Program is always required. If a participant is registered to more than one program or trial, these will not immediately be displayed on the participant card. Instead, these registrations will appear in a list when the member attempts to check-in so that the attendance is connected to the correct registration.
- Membership will show the specific option of the program the participant is signed up for.
- Rank will show the belt rank associated with their registrations
- Progress will show how many attendances the participant has accrued compared to how many is needed for the next rank/level.
Save any changes to the attendance portal settings by clicking the save button at the bottom of the screen.