
Table of contents
Permissions and accessibility
Staff access:
- Admin
- Full access
- Manager
- Full access
- Staff
- No access
MyStudio plan restrictions:
- None
Table
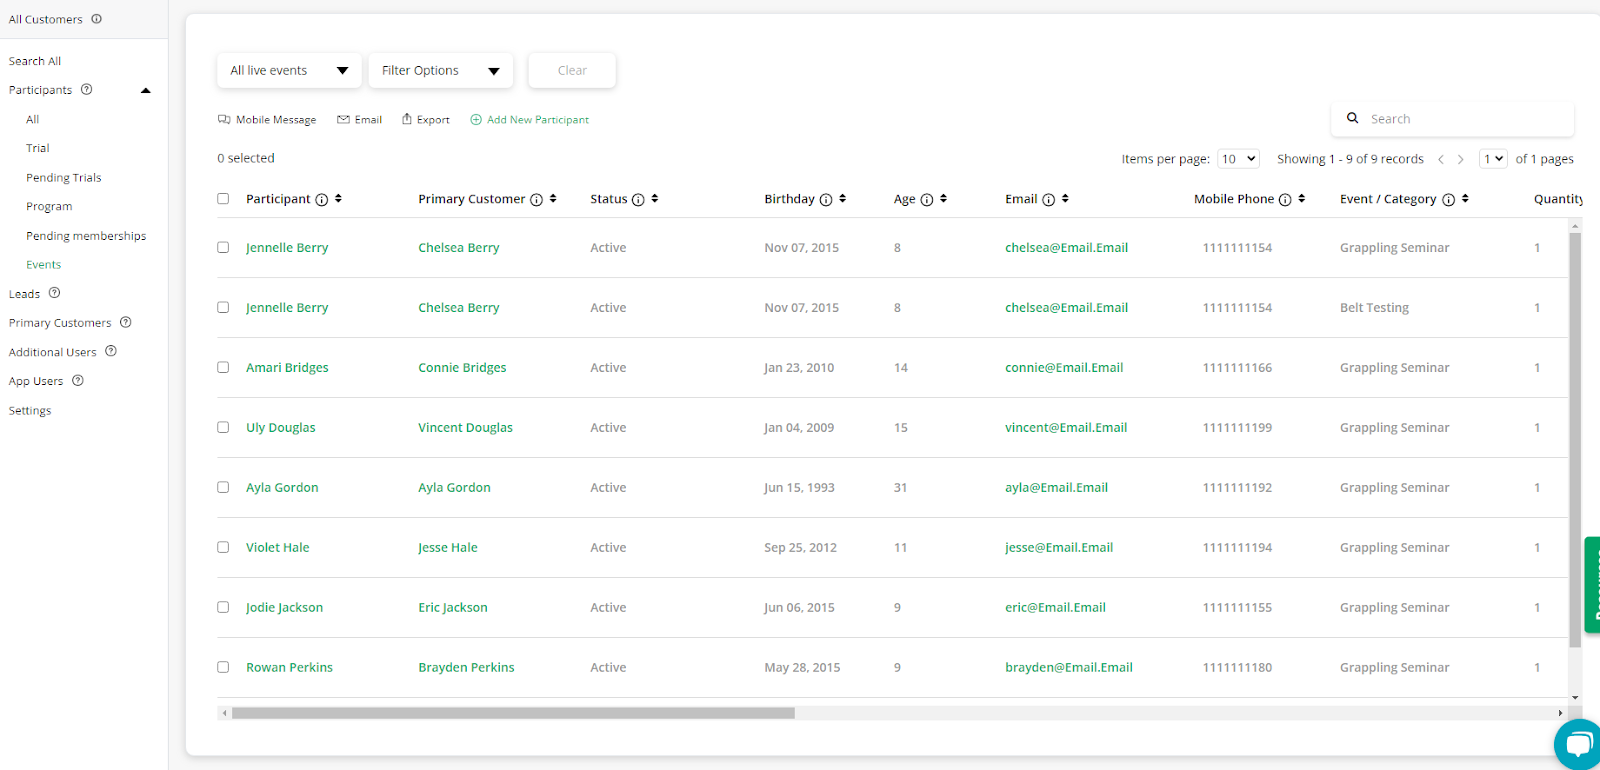
Access your event participants from all customers > event participants. Here you will see a list of all active event members. The table will show you the following information:
- Participant: click this to access the event registration internal page
- Primary customer: click this to be redirected to the primary customer profile
- Status
- Birthday
- Age
- Email: click this to open the email creation
- Mobile phone
- Event / category: which event category was registered for
- Quantity: how many quantities were registered. This will also show how many event date / options were ordered
- Total cost: total cost of the event whether paid yet or not
- Total paid: the amount already paid
- Balance due: the amount that still needs to be paid
- Canceled future payments: amount that the customer will not be responsible for because payment was canceled
- Refunded: amount that has been refunded
- Registration date
- Registration method
- Source
- Paid marketing ID: for Google ad and Facebook ad source
- Level/Rank: for ranked events
- Custom participant fields: created in all customers > settings
Above the table there are several actions you can take:
- Mobile message
- Export
- Transfer: only appears if one participant is selected. Transfers the event registration to a different participant. Check out our article here for more info: Transferring Registrations
- Add as a lead: only appears if participants have been selected
- Delete: this will only delete the registration, not the participant
- Add new participant: this only shows when no participants are selected. This will redirect you to the staff point of sale
- Rank updater: this will only appear if you filter by a ranked event and select either “all dates” or select a specific date. Check out our article here for more info: Mass Rank Updater
Note: If you are with our ATA integration, see this article for the rank updater: ATA Belt Rankings
Filters
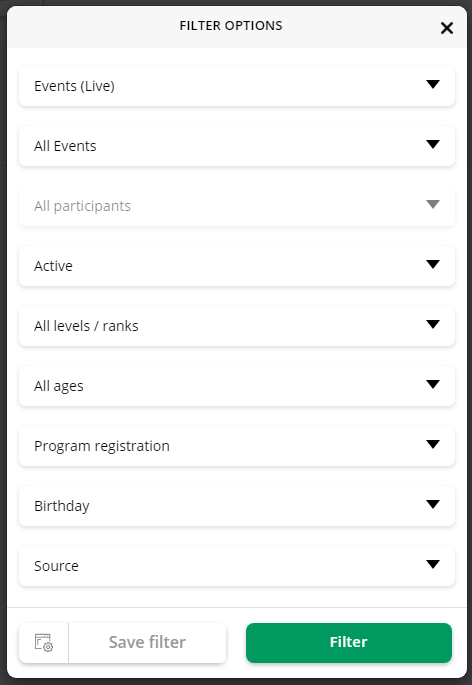
Above the table and table actions there are two drop downs for filtering the event participants list. The first one contains default or custom saved filters. Currently, we only have one default filter for events.
You can manage saved filters by clicking “manage filters.”

This will bring up a list of your saved filters. Click the email icon to make edits to the name or email filter report option. Click the trash can icon to delete the saved filter.
The second drop-down contains the specific filters you can apply. These filters include:
- Event listing
-
- Live
-
- Draft
-
- Past
-
- All
- Event title
- Event options
-
- All participants
-
- All event dates
-
- Specific date / options
- Status
-
- Active
-
- Canceled
-
- Deleted
- Levels / Ranks
-
- All
-
- Specify by program
- Ages
-
- All
- Custom: enter age range as of a specified date
- Program registration
-
- Do not specify
-
- Has registered for
-
- Has not registered for
- Birthday
-
- Do not specify
-
- Today
-
- This week
-
- This month
-
- Custom
-
- Date range
- Source
-
- Member referral
-
- Google: selected from “how did you hear about us” options
-
- Facebook: selected from “how did you hear about us” options
-
- Studio location
-
- Google ad: from your Google ad link
-
- Facebook ad: from your Facebook ad link
If you find yourself selecting the same filters frequently, we recommend saving the filter by clicking “save filter” at the bottom of the filter list.
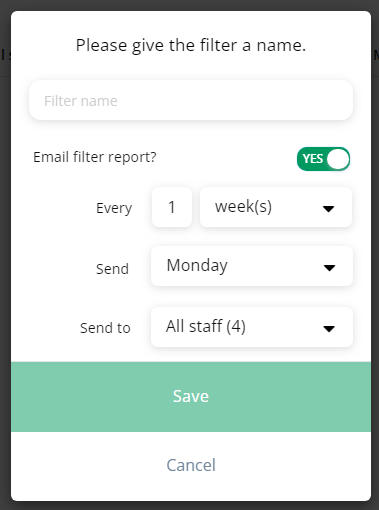
When you do, you will be prompted to give the saved filter a title and whether you would like to receive an email report about the filter periodically.
If you select “yes,” you will ended to select the following:
- How often you would like to receive the report: x number of weeks or months
- When it will send: which day of the week or month
- Who will receive the report: this follows your staff list in my account > users and permissions
Once saved, you will also be asked if you would like to set up the filter as a custom automation! These automations are great for sending automation communication to the participants that fit the filter criteria. For example, you can create a custom campaign to send a happy birthday message using the birthday filter.
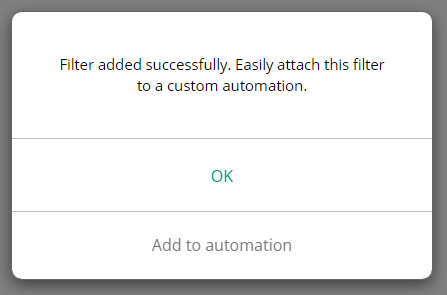
To add the saved filter to an automation, click “add to automation” and you will be redirected to the custom automations set up.
Event registration internal page
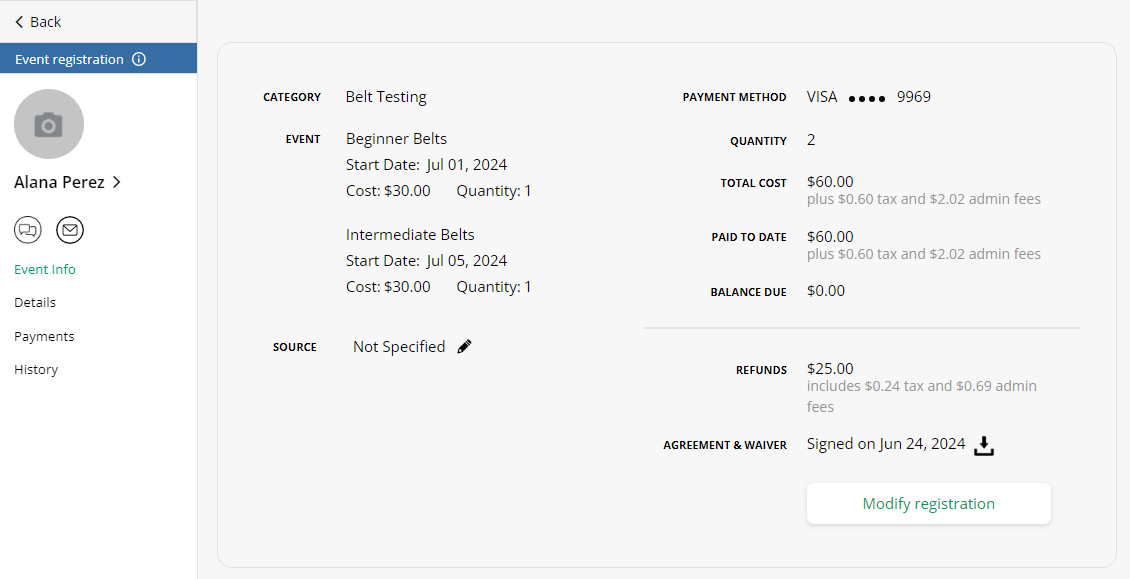
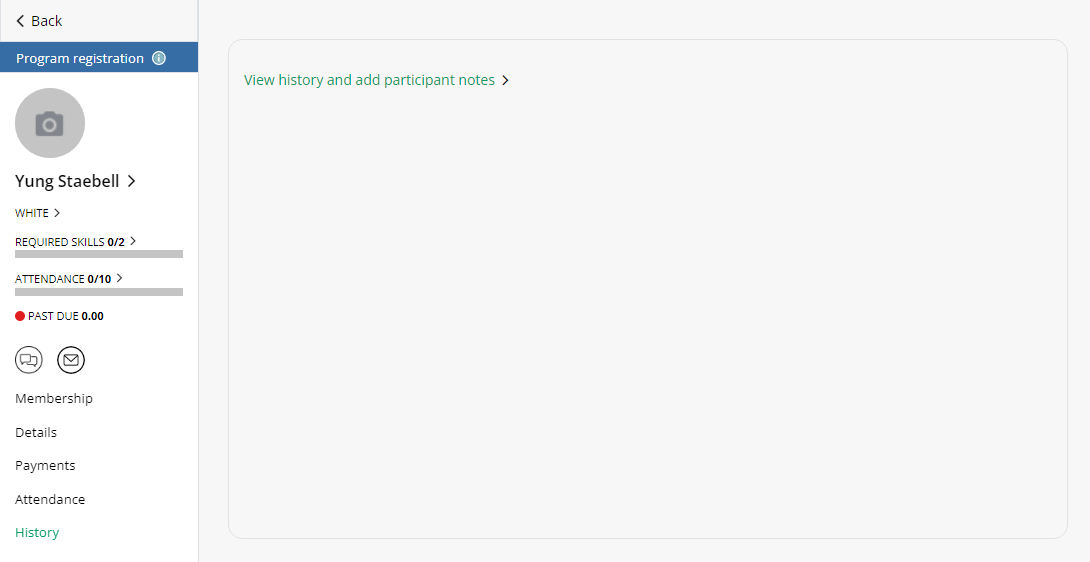
If you click on a participant name from the event participant’s table, you will see the event registration internal page. Here, you will see the following items on the left:
- Participant photo: clicking this will prompt you to be redirected to the participant account in order to update the photo
- Participant name: clicking this will redirect you to the participant profile.
- Past due amount
- Mobile message icon
- Email icon
- Event info: presents information about the event registration
- Details: displays custom participant and registration fields
- Payments: payment information pertaining to the event registration
- History: prompts you to be redirected to the participant account in order to see participant notes
Event info
Certain fields of information only display depending on certain scenarios.
Single event
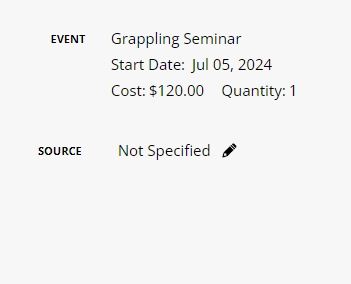
If the registration was for a single event, the left side of the screen will display the event, listed with the start date, cost, and quantity, and the source. Click the pencil to edit the source.
Multi date / option event
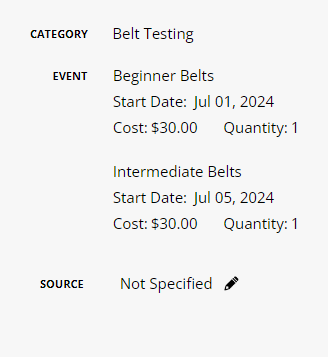
If registered for a multi date / option event, the left will contain the event category, the event dates registered for, listed with their start dates, cost, and quantity, and the source. Click the pencil to edit the source.
No payment plan
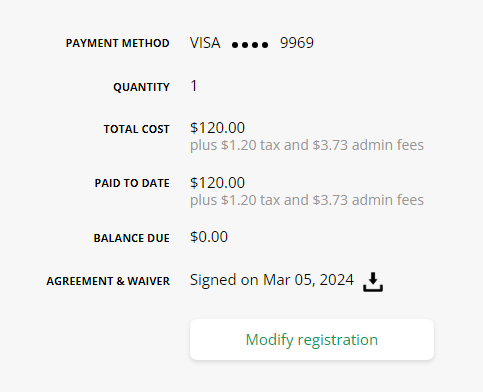
If the event had been paid in full or fully paid after a payment plan, the right side of the screen will show the following:
- Payment method
- Quantity
- Total cost
- Paid to date
- Balance due
- Agreement & waiver: click the download button to download a copy of the signed waiver.
Upcoming payments
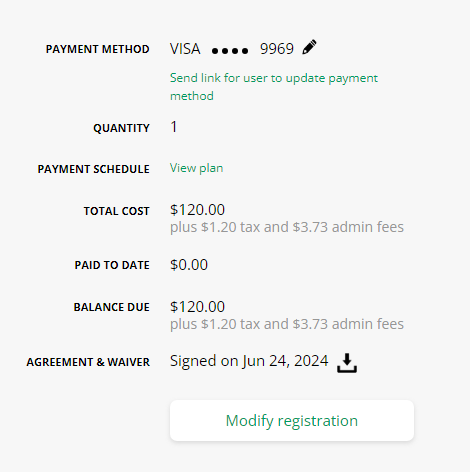
If the registration still has upcoming payments, the right side of the page will display the following:
- Payment method: click the pencil to attach different payment information, or click “send link for user to update payment method” to have the customer update the information from their side
- Quantity
- Payment schedule: clicking this will show all future payments
- Total cost
- Paid to date
- Balance due
- Agreement & waiver: click the download button to download a copy of the signed waiver.
Refunds
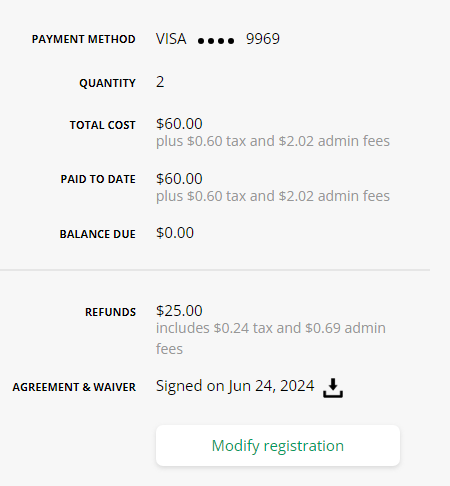
If the registration has refunds attached to it, you will also see refunds listed above the agreement & waiver.
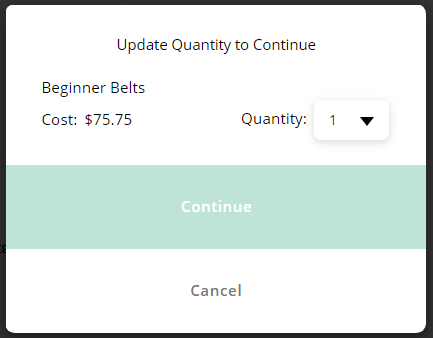
Modify registration
You can select “modify registration” to cancel events or event date / options. After clicking “modify registration,” you will need to change the quantity of each event or event date you want to cancel.
The majority of the time you will then be presented with the breakdown of the cancelation’s effects on payments and will ask you if you would like to refund what the customer has already paid.
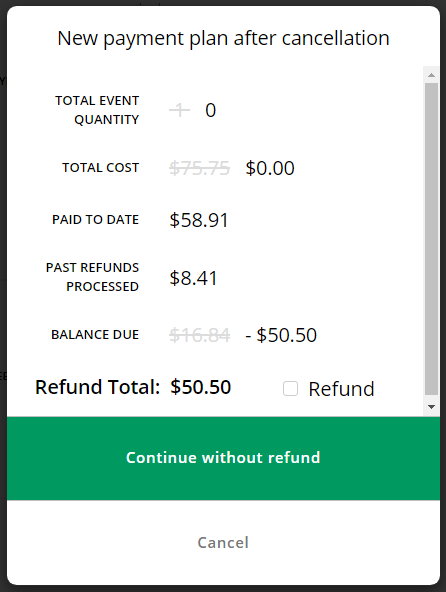
However, please note that because of the amount of payment plan options we offer at the event creation step, you may see other options for cancellations as well. Please check out our article here for those scenarios: Refunds.
Details
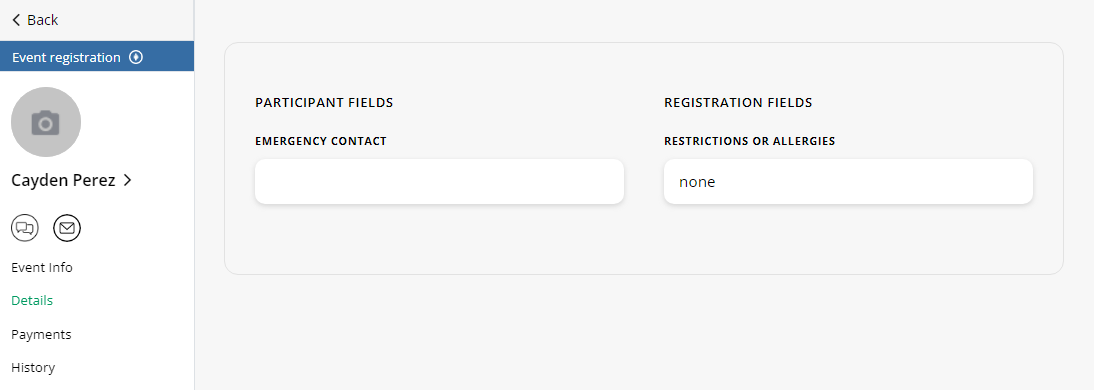
The details page displays the custom participant fields set up in all customers > settings as well as the custom event registration fields set up in services and products > events > edit the event > registration fields. Clicking on the participant field will redirect you to the participant profile to edit the information. Clicking on the registration field will allow you to edit directly from this page.
Payments

The payments section in the event registration internal page will show you the past due, upcoming, and payment history for that specific event registration. You can send the payment history to the customer by clicking “send member payment history” at the top right.
Past due

If the event had a payment plan, the past due section will display all past due payments for the event registration. You can re-rerun all listed by clicking “re-run failed payments,” or you can rerun them individually by clicking on one of the past due payments > re-run payment.

Clicking on the past due payment will also show you a breakdown of the cost and allow you to apply credit towards the past due amount. If you select apply credit, you will need to enter the following:
- Credit amount: if the customer has paid for more than one past due payment, this will just be the max for the one payment. You can then select the next past due payment to apply the same payment method.
- Credit method: how the customer is paying for the past due payment
- Manual credit: this works the same as a coupon or gift credit you are giving to the participant. It does not affect your sales analytics or income amounts and effectively erases the past due payment.
- Cash: customer paid in cash for the past due payment
- Check: customer paid in check for the past due payment. If they paid for more than one past due payment with the same check, the same check number can be entered multiple times on other payments.
Note: While credit methods towards past due program payments include CC and ACH, you cannot apply these credit methods towards past due event payments.
Upcoming

The upcoming section shows you the payments that the member will have in the future. If you click on an upcoming payment, you will see a breakdown of the total and you can do one of the following:
- Apply credit to this payment: click this if the customer chooses to pay early or you are giving a manual credit.
- Manual credit: this works the same as a coupon or gift credit you are giving to the participant. It does not affect your sales analytics or income amounts and effectively erases the past due payment.
- Cash
- Check: customer is paying with a check for the upcoming payments. If they are paying for more than one upcoming payment with the same check, the same check number can be entered multiple times on other payments.
- Edit payment: click this to edit the payment amount or the payment date. When editing the amount, you will be asked if the edits are applying to only the one payment or all future payments as well. Editing payment dates can only be done one at a time.
- Modify registration: clicking this will prompt you to edit the quantities of the event registration in order to make cancellations
Payment history

The payment history section will show you a list of what has already been paid towards the event registration. “D” represents the deposit if there is one.
Clicking on the payment history transaction will show you the total (including the breakdown of taxes and fees) and the payment method.
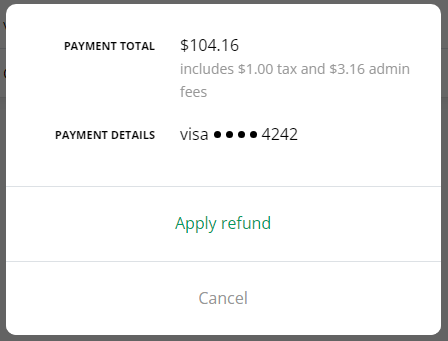
You can refund the payment from this selection. When applying for a refund, you can enter the full amount, or type in a partial refund. In either scenario, refunds will not impact the status of the registration.
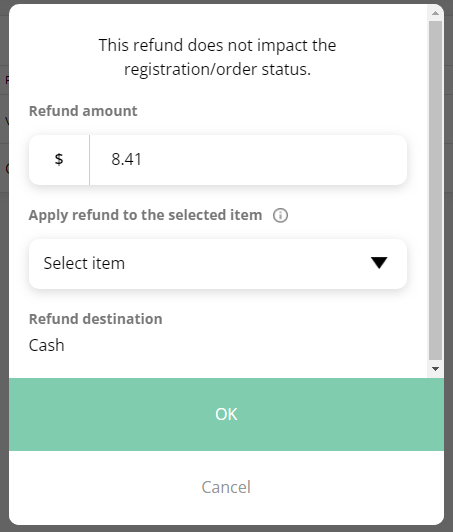
Refunding events requires you to assign the refund to an event or event date. This is because deposits can be redirected to the following payments depending on which item is receiving a refund. Be sure to make your selection from the drop down.
Typing in a partial refund will then show you a summary of the remaining payment with a breakdown of admin fees and taxes.
Refunds will also display in the payment history list, and you can click on this item to see the breakdown of the total refund, which payment was refunded, how it was refunded, and when it was refunded.
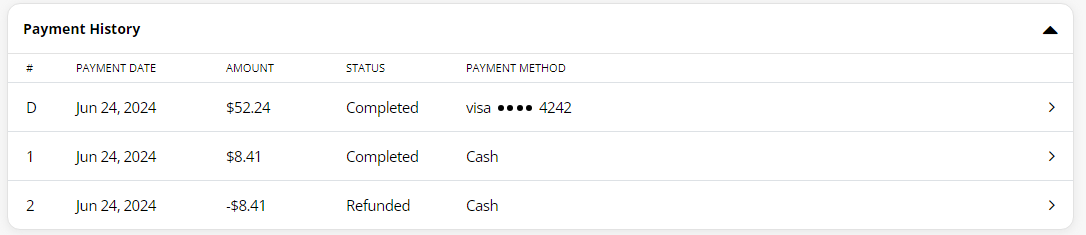
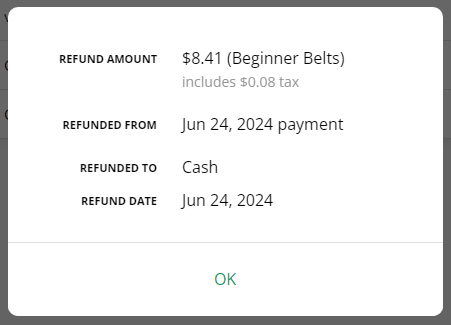
You can complete as many additional refunds on a remaining total later.
NOTE: Because manual credits act as coupons or store credits, you cannot refund or undo a manual credit.
History
The history section will only redirect to the participant profile > notes section. For more information on this section, check out our article: All Participants.